

How To Create A Basic Gantt Chart
How to Make a Gantt Chart
A gantt chart comes in handy when your project requires more planning than a basic to-do list. This guide will give you the basics of what you'll need to create a gantt chart, no matter what platform you choose.
For a more detailed look into creating a turbocharged project plan, check out TeamGantt's Guide to Project Planning.
In this chapter, we'll go over:
- What you need to create a gantt chart
- How to create a gantt chart
- The dos and don'ts of creating an effective gantt chart
- How to use a gantt chart
What you need to create a gantt chart
You can't build a gantt chart without knowing some basic project information. That's why it's important to answer a few simple questions first.
These questions can help you gather all the right details so you can sketch out a project plan before you sit down to create your gantt chart.
What to consider when making a gantt chart
- What are the major deliverables?
- How will we get to those deliverables and the deadline?
- What are the milestones we need to hit?
- Are there dependencies that could impact the timeline?
- Who is on the project team, and what role will they play in those deliverables?
How to create a gantt chart in minutes
One benefit of a gantt chart is that it's easy to create. There are a variety of ways to make a gantt chart. For instance, some people use Google Sheets or Excel to build a gantt chart, while others use collaborative project management software. Just be sure to choose a gantt chart builder that gives you the features you need.
Follow the steps below to learn how to make a gantt chart in TeamGantt in minutes.
Step 1: Set up your project details
Sign up for your FREE TeamGantt account.
To create a new gantt chart in TeamGantt, click the New Project button in the upper right corner of the My Projects screen.

Give your project a name and start date, and select the days of the week you want to include in your project.
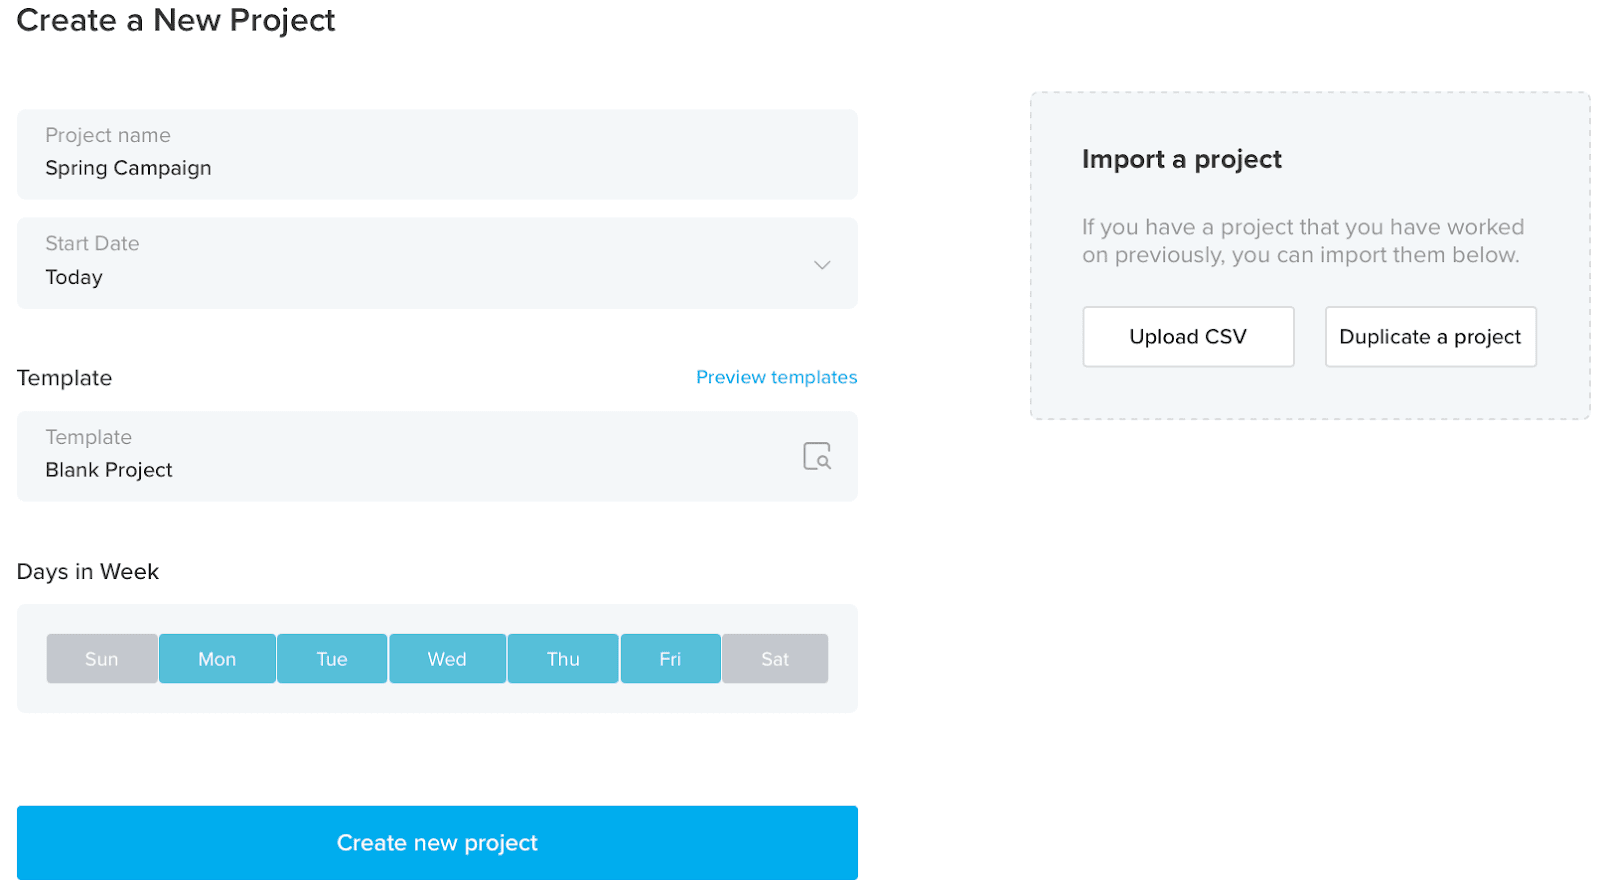
Here, you have 2 options for fast-tracking your build if you don't want to create a gantt chart from scratch:
- Create a project from a template
- Import a project via CSV
Once you've completed these basics, click Create New Project to move on to adding tasks.
Step 2: Add tasks to your project
Adding tasks to your gantt chart is the first step in creating your project timeline. To create tasks, click on the Add Task link (+Task), and type the name of your first task.

Hit enter to add another task. Repeat this process until you have all (or most) of your tasks added to the task list.
Step 3: Schedule your tasks
Now that you've got a full list of work to be done, it's time to schedule all those tasks. TeamGantt makes scheduling tasks super-simple because you can drag and drop each task on your timeline.
To place the taskbar on your gantt chart, simply click on the timeline below the date you'd like to schedule your task. Then drag either side of the taskbar to shorten or extend the task's duration.

Step 4: Add important project milestones
Adding milestones to your gantt chart makes it easy to track project deadlines, approvals, meetings, and other key deliverables or events. In TeamGantt, a milestone appears as a yellow diamond on your gantt chart.
To add a milestone to your gantt chart, simply click on the Milestone link, give your new milestone a name, and drag the milestone icon across the gantt chart to schedule it on the timeline.

Repeat this process until you have all your milestones added to the list.
Step 5: Add dependencies to the tasks that need them
Now that your tasks and milestones are entered and scheduled, hover over a task, and click the gray dot that appears.

Click and drag the dependency line to the task you want to link it to.

Step 6: Invite people to your project and assign tasks to those responsible
Click the Invite People button at the upper right corner of your project to go to your project's People page. From there, click the blue Invite People link, located just below the list of people who are already part of your project.

If the user already exists in your account:
Simply select the checkbox next to the person you want to add to your project, then click the blue Add to Project button that appears. This person will automatically receive an invitation to log into TeamGantt and access the project.

If the user does not exist in your account yet:
Click the Add New Person link. Then enter the person's name and email address, select their company-level permission, and click the Add User to Company button. (Note: Guest users and Basic users are automatically added with View Only project permission, while Advanced users are added with Edit Chart project permission.)
Feel free to add your own custom notification message, then click Add to Project to finalize the invite. This person will automatically receive an invitation to get set up in TeamGantt and access the project.
Learn more about inviting people to your project in TeamGantt.
Step 7: Apply task colors to enhance visualization on your gantt chart
Color is a great way to make your gantt chart easy to understand at a quick glance.
Hover over a taskbar, and click on the colored square. Choose a new color, and you're all done!
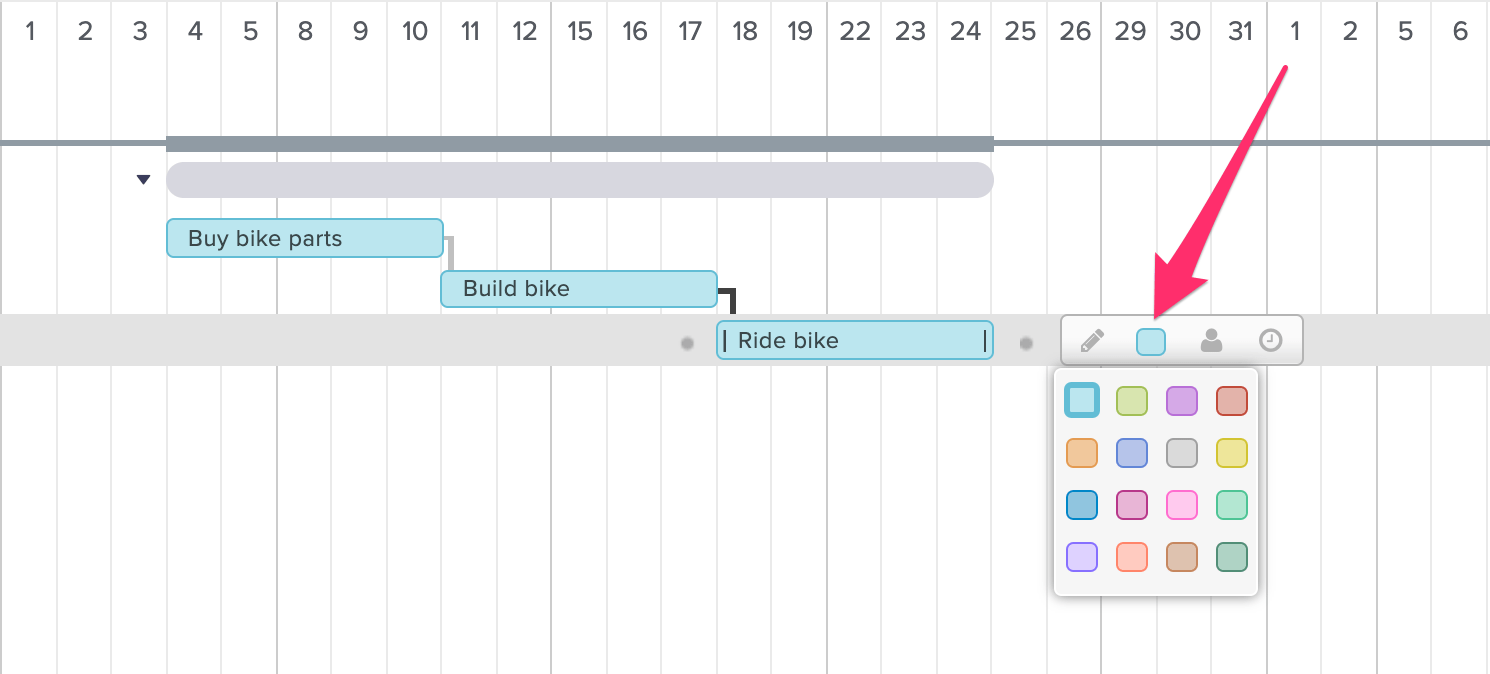
Tip: You can set a default color for each person on your team in TeamGantt. Simply select the People tab at the top of your project, then click none next to each user to assign a default task color. Now, each task you assign to that person will automatically be the color you selected.
The dos and don'ts of creating an effective gantt chart
If you want to build a gantt chart everyone can use and navigate, there are a few simple rules you should keep in mind. Follow these simple tips and best practices to make a good gantt chart that's easy to update and manage.
Do get granular with tasks.
The more detail you can spell out when it comes to tasks, the better you'll be able to track progress and steps leading up to a deliverable. Refer back to your work breakdown structure, and list the steps you used to create that.
Do organize tasks into groups or phases.
Creating groups of tasks will make your plan easier to scan and understand. It'll also allow your team and stakeholders to see what tasks are part of a deliverable or a phase.
Here's a quick look at how subgroups work in TeamGantt.
Do add important details and documents to tasks.
Sometimes your team and clients may forget what they committed to. Or maybe they don't fully understand the intent of a task or group.
Use the notes section of your plan (most good gantt software should provide this) to spell things out. While you're at it, be sure to upload key files directly to the task so everything's ready and waiting for work to begin.

Do label tasks by responsible party.
This tip comes in handy for any project, but it's especially useful for client projects. Identifying which team or company is responsible for each task makes your gantt chart super-easy to scan.
When creating a task, you can assign labels you've set up on the People tab or simply put the company name (or an acronym) in front of the task. Here's how we tagged tasks in the following gantt chart example:
- PT = Product Team
- GM = Gantt Museum

Of course, you'll also want to take that a step further and assign each task to the person responsible. This will help you with resource allocation and accountability.
Do display start and end dates for each task
Seems like a silly tip, but it's easy to hide this info in some apps! If you're using TeamGantt, you'll see the dates in the gantt view.
Regardless of what tool you're using, you want to make it clear not only when a task ends, but when it starts. Again, this will help to keep your team and clients accountable.
Don't skip dependencies.
If you're not going to move forward on the project without an approval—or one task must be done before another—now's your chance to note it.
Not every planning tool offers dependency functionality, and it can be a huge help. As your plan shifts, the flow of the work will stay intact.
Don't assign work without checking team availability.
If you're lucky enough to use a product that shows you overall team availability, use it! Knowing how booked your team is and what projects they're part of will play a huge role in delivering work on time and maintaining team morale.
Having an overall view of your team's availability and conflicting work will help you adjust your plan to either meet the needs of existing project work or shift the milestones you've put in your plan.
Here's how to view team availability directly from your gantt chart in TeamGantt.
Don't overlook holidays and time off.
Now is your chance to block time off in your plan. This is important now because as soon as your timeline shifts (you know it will, don't fight it), you'll open yourself up to making an error and dropping a deadline on a date that should be blocked. If you note them in your plan, that won't happen.
Don't forget to ask for feedback.
If you deliver a plan that has a mistake, misinterprets a task, or even misses a date, it can create confusion and delays. So grab a teammate and ask them to review your gantt chart before you post it for review.
Of course, you'll also want to be ready to get some feedback on your plan. Formalizing a plan means you're taking a set of ideas and expanding on them. That also means you might interpret something differently than a teammate. That's okay!
Don't set it and forget it.
A gantt chart is a living, breathing document that should keep up with project changes—not a fixed plan that's set in stone. Invite your team to collaborate on work and track progress in real time so your gantt chart's always up-to-date.
How to use a gantt chart in project management
Now you know how to make a gantt chart to plan and schedule project tasks. But that's not all they're designed to do!
Let's explore some easy ways you can use a gantt chart to manage and track your projects in TeamGantt.
Watch this video for quick tips on how to use a gantt chart effectively.
Collaborate with your team and stakeholders
Successful projects run on communication and collaboration. When project files and updates are scattered across different email threads and other platforms, it's hard to get a good sense of what needs to get done and how close you are to the finish line.
With an online gantt chart, you can streamline communication through a single channel that centers around your project plan.
Here's how to use a gantt chart to boost collaboration with your team and stakeholders.
Use comments to discuss tasks and share project files
Got a mockup that's ready for design review? Or need more info to get started on your task? Add a comment to the task, and be sure to tag the person you're updating so they'll get automatically notified.
You can also upload documents directly to a task, group, or project. TeamGantt supports version control, so it's easy to find the latest version of any document.
And if you need to share important details up front, that's what sticky notes are for. For instance, you might want to document how many hours have been scoped for a task or outline specs for a design project.
Watch this video to see team collaboration in action in TeamGantt.
Share your gantt chart with external stakeholders
Need to share project updates with contractors, clients, or other stakeholders? In TeamGantt, you have several options for sharing your gantt chart with external users:
- Invite someone as a guest to your project: Inviting someone as a guest enables them to see and comment on tasks in a single project without making edits to the gantt chart itself.
- Send a view-only link to your gantt chart: This option is great if you want to enable a client or stakeholder to monitor project progress without inviting them to become a user on your account.
- Export your gantt chart as a PDF: This option enables you to filter a gantt chart down to only the information you want to share so clients and stakeholders can get a quick snapshot of the project.
Integrate your gantt chart with other collaboration apps
If your team uses multiple apps to collaborate on projects, why not integrate them with your gantt chart so everything connects back to the plan? Here are a few popular integrations you can use to keep your people and projects in sync:
- Trello: See your cards in a project timeline, create dependencies between cards, and view workloads—all without ever leaving Trello.
- Slack: Create tasks from chats, check your daily task list, and get notified about new comments and assignments right from Slack.
- Dropbox: Share important documents more easily by uploading Dropbox files directly to your tasks and projects.
- Zapier: Automate work and streamline collaboration by connecting TeamGantt to your other favorite apps.
- TeamGantt API: Got a developer on hand? Build custom integrations with your TeamGantt data using our public API!
Manage resources and team workloads
It's hard to finish any project on time and budget when your team is overloaded and overwhelmed. A gantt chart plots everyone's work on a visual timeline so you can see how tasks stack up across your projects.
In TeamGantt, you can check and adjust workloads right from your gantt chart to avoid overbooking your team as you schedule new tasks.

Take a closer look at how to use gantt charts for project resource management.
Estimate project time and effort
Assigning hourly estimates to tasks in your gantt chart makes it easier to assess project scope, balance team workloads, and monitor project budget once work gets underway.
TeamGantt's Advanced plan comes with hourly estimation and time tracking. You can use these features to track and compare estimated vs. actual hours directly from your gantt chart. With that kind of visibility, you can keep a close eye on potential overages and get ahead of issues before they throw your whole project off course.

Estimating hours at the task level also gives you a more granular view of availability when assigning and scheduling work for your team. That way you can feel more confident your team can get the work done without missing deadlines.
Learn more about hourly estimation in TeamGantt.
Track progress against deadlines and estimates
One of the best things about using a gantt chart is the ability to see where a project stands at any given moment. After all, clients, bosses and other project stakeholders expect you to stick to your promises (aka: budgets and deadlines).
That's why it's important to monitor tasks to ensure you're on track to deliver work on time and budget. If things start to go sideways, you can adjust the gantt chart to get things back on track and reset expectations along the way.
Here's how to track progress and spot issues early in TeamGantt.
Update and monitor progress
Checking things off a list is a pretty satisfying thing to do. What's even more satisfying is updating the % Complete of a big task and watching the taskbar fill in until it's 100% done.
Seeing the status of your teammates' and coworkers' tasks can be a healthy motivating force too. When you know the up-to-the-minute status of other tasks—especially those tasks that may rely on your tasks—it keeps everyone moving in the right direction.
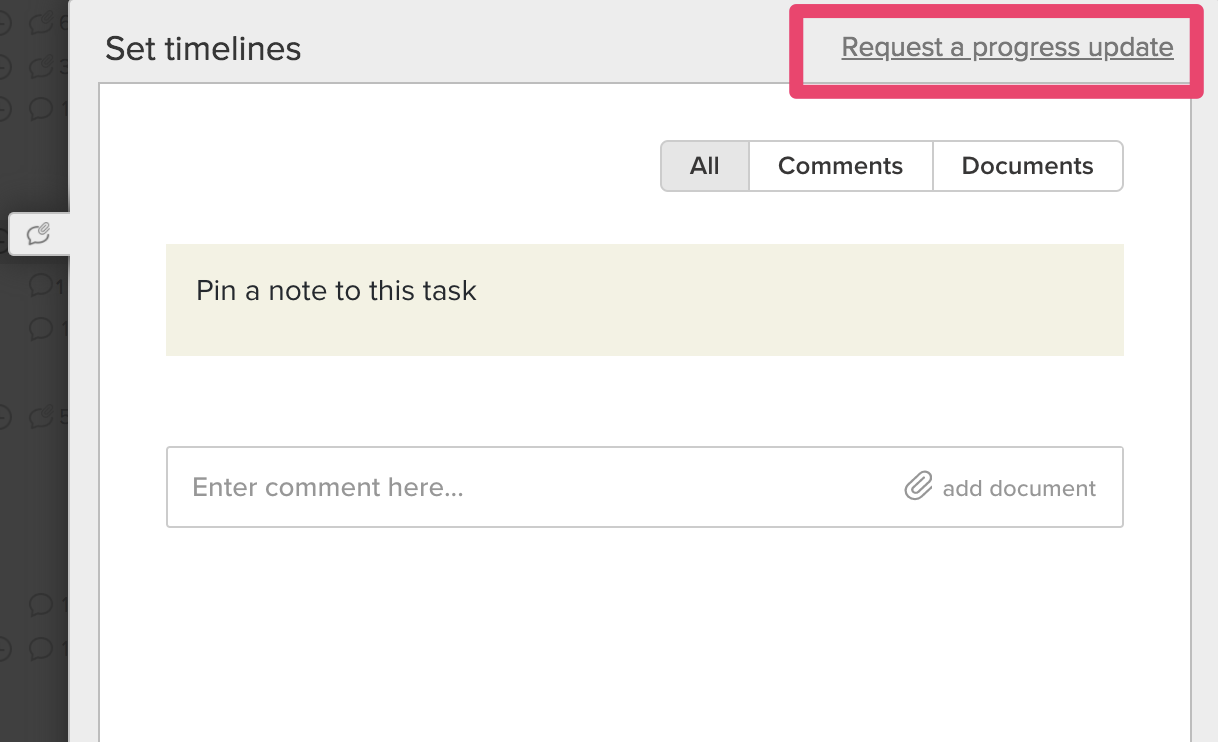
How to request a progress update in TeamGantt
Need to know where someone stands on a particular task? TeamGantt makes it easy to do a quick status check and remind team members to update their progress.
Here's how it works:
- Click the chat bubble to the left of the task to open the comment window.
- Click Request a progress update at the top of the comment window.
- TeamGantt will send anyone who's assigned to that task an email asking them to update their progress.
Hourly estimate vs. actual progress
TeamGantt's Advanced plan enables you to compare hourly estimates with actual progress so you can easily spot tasks that are taking longer than expected. Simply look for the thin striped line in the middle of each taskbar on your gantt chart, and pay attention to its color and length.

These indicators signal task trouble:
- The striped line is red: This task (or group) is over-budget. More hours have been tracked than were originally estimated for the task.
- The striped line is longer than the progress indicated for a task: The hours tracked are outpacing actual progress. That means this task (or group) is at risk for going over budget or missing a deadline.
Baselines
Remember how I said no matter how much planning you do, it's likely something will come up that requires you to move your timeline? It's handy to know how much you've had to move things over the course of a project. Enter: baselines.
What is a baseline in a gantt chart?
A baseline is a "snapshot" of your project in time. When you create a baseline set, you're grabbing a picture of your whole project so you have something to compare to when things inevitably shift for one reason or another.
Baselines are extremely important because they give you the "real" picture of shifts that have occurred. It's easy to think things are looking pretty good, when in reality you're 3 weeks behind and $10,000 over budget. Things can creep slowly, and without a set of baselines to compare to, it can be easy to get behind and not even fully realize it.
Learn how baselines work in TeamGantt.
Using multiple baseline sets in your gantt chart
A single baseline is great, but a single point doesn't show trends. Stringing multiple baseline sets together will give you a much clearer picture of when and why your project slipped. Was it due to consistently dragging manufacturing estimates? Or was it that the client was consistently slow in approving designs and signing contracts? Baselines can tell you exactly what you need to know so you can improve your estimating practices.
Baselines aren't just for showing you the negatives of your project. They're equally useful for seeing where things have gone better than expected. Just like you have to shift things around when tasks are delayed, you may have to make adjustments when things run ahead of schedule.
As you get better at tracking your project's slippage, you'll get better at making realistic estimates on timelines. Once you've mastered that skill, you'll have customers lining up because they know that when you plan a project, they have a timeline they can count on.
Continue learning about gantt charts
Now that you know how to make a gantt chart, you're ready to move on to the next step! Keep reading to learn how to use your gantt chart to manage your team's time and availability more easily.
How To Create A Basic Gantt Chart
Source: https://www.teamgantt.com/what-is-a-gantt-chart/how-to-make-a-gantt-chart
Posted by: jacksonsentin2001.blogspot.com
0 Response to "How To Create A Basic Gantt Chart"
Post a Comment