

How To Draw A Wrist Watch Step By Step
- 37 min read
- Graphics, Tutorials, Sketch
Today, you will learn how to create a very realistic and detailed vector illustration of a watch using basic shapes, layer styles and cool Sketch functions such as "Rotate Copies" and "Make Grid." You'll also learn how to apply multiple shadows and how to use gradients, and you will see how objects can be rotated and duplicated in special ways. No bitmap images will be used, which means you will be able to easily adapt the final image to different sizes and resolutions.
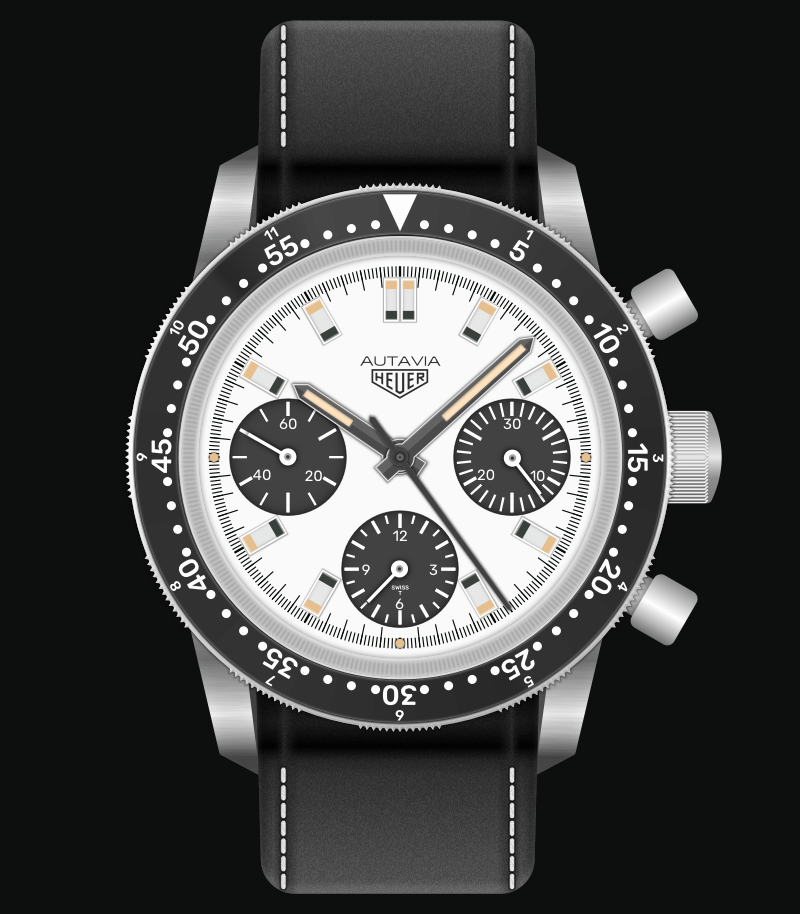
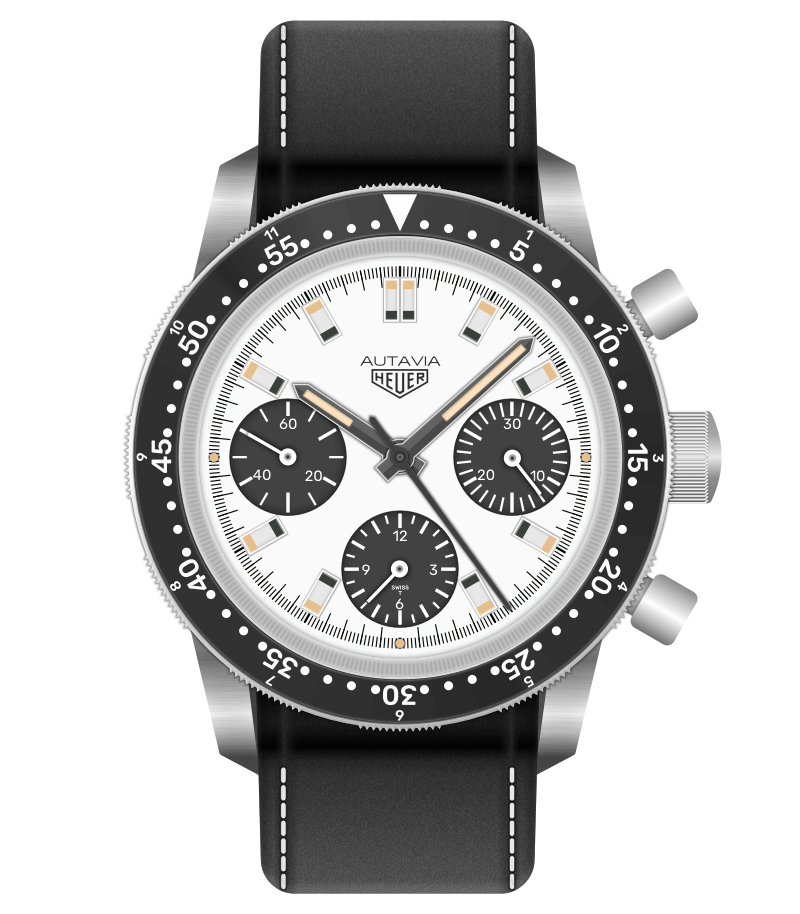
While Sketch is undoubtedly an excellent UI design tool, it can be used as a powerful illustration tool as well. So, in this tutorial, we'll be walking through the process of creating the iconic Heuer Autavia wrist chronograph, all in vectors.
Heuer Autavia
The name "Autavia" comes from a combination of the watch's target markets (automotive and aviation), and it was unveiled way back in 1962.
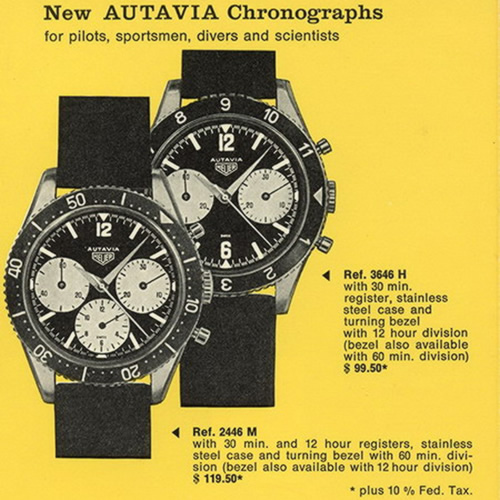
The watch became iconic almost instantly, thanks to its simple yet elegant design, optimum readability, built-in chronograph mechanism and rotating bezel. And there's a beautiful "panda style": a light-colored dial with three black subdials. You can search on Google Image before we begin to check some reference images of this watch.
The File For This Tutorial
To be able to better follow the steps in this tutorial, download the Autavia.sketch editable file (1 MB). This file will help you follow the process more easily; however, I encourage you to replicate the steps in a new file, with a blank canvas. Have fun!
More after jump! Continue reading below ↓
Set The Artboard
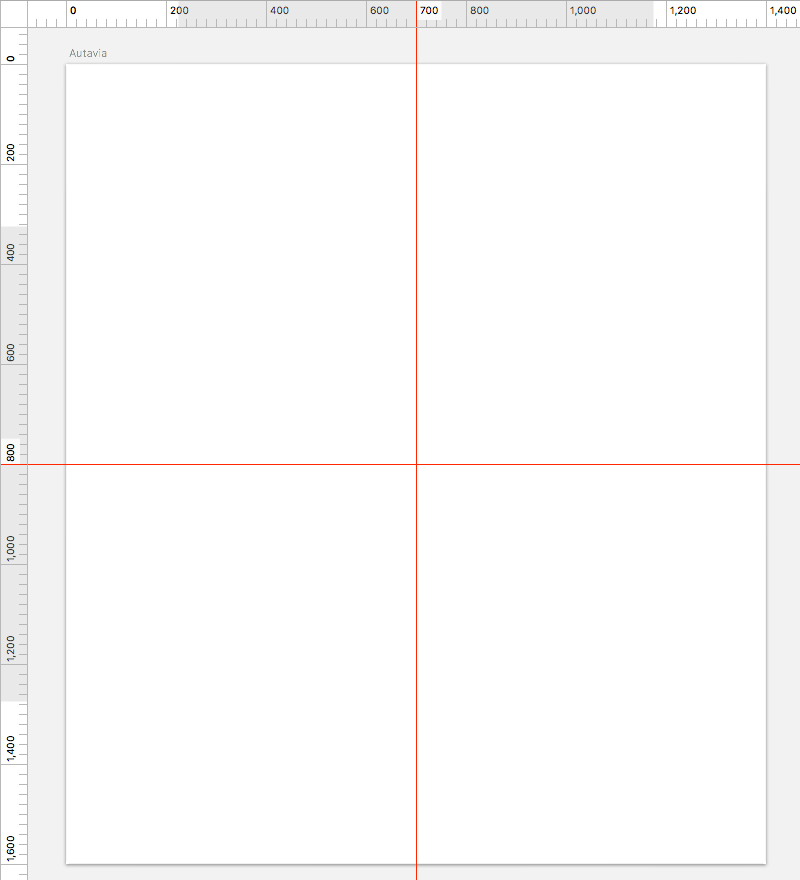
The first step is to create a new document, named Autavia. Set up a new artboard with the same name, 1400 pixels wide and 1600 pixels high, and positioned 0 (X) and 0 (Y).
To make alignment of all elements easier, let's add some guidelines. First, show the rulers with Ctrl + R. Then, add a vertical guideline at the center of the artboard with a click on the upper ruler, and do the same for the horizontal guide on the left ruler. Pressing Shift when hovering over the ruler will snap to 10-pixel increments, making it easier to set the guides precisely. For correct placement, you could also look at the positions of the guides when you hover over the rulers: 700 pixels for the vertical guide and 800 pixels for the horizontal guide.
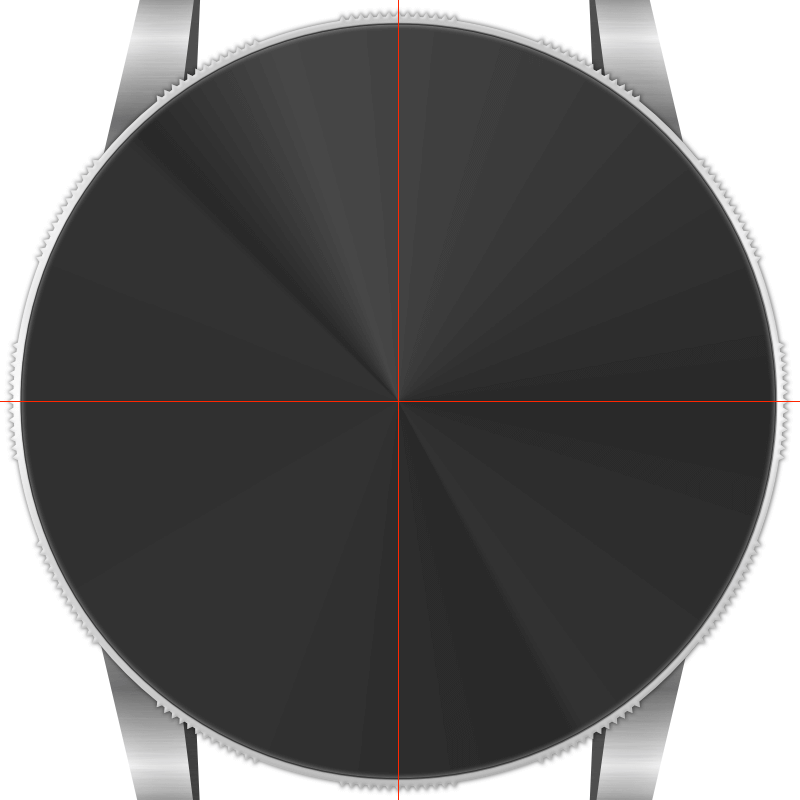
The Case
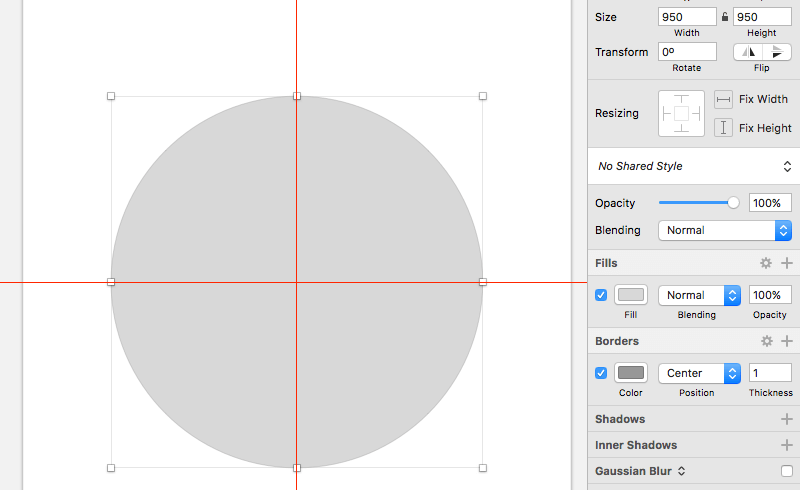
The base of the watch case is a simple circle. Switch to the Oval tool by pressing O on the keyboard, and draw a circle from the intersection of the guides (i.e. the center of the artboard), with a diameter of 950px.
Let's create the lugs. Select the Vector tool by pressing V on the keyboard, and draw a shape like in the image below.
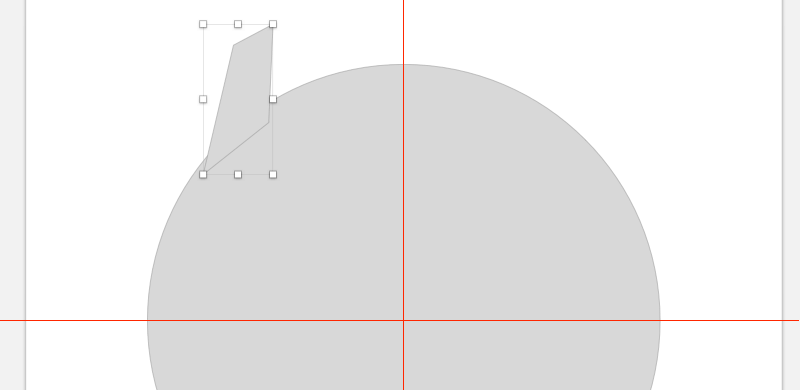
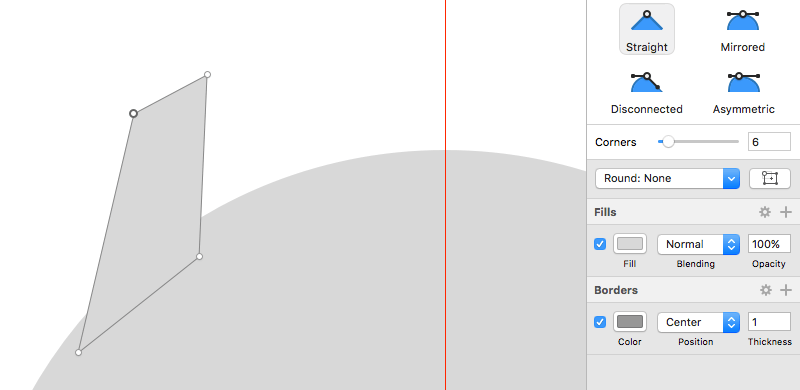
Press Enter to go into vector point mode, select top-left point, and from the Inspector panel, set Corners to 6. Leave this mode again by pressing Enter. Hold the Alt key, and point to the vertical guide with the mouse to measure the distance from the center.
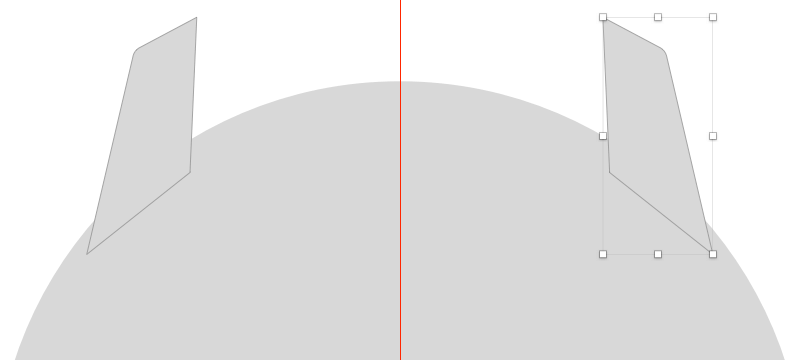
Duplicate (Cmd + D) this shape, Flip Horizontally, and position it like in the image below. Hold the Alt key and point to the vertical guide with the mouse; leave it there; and use the arrow keys to set the shape to exactly the same distance from the center, like the first one. Now, measure the distance from the horizontal guide. We'll need to position the bottom lugs the same distance from the center.
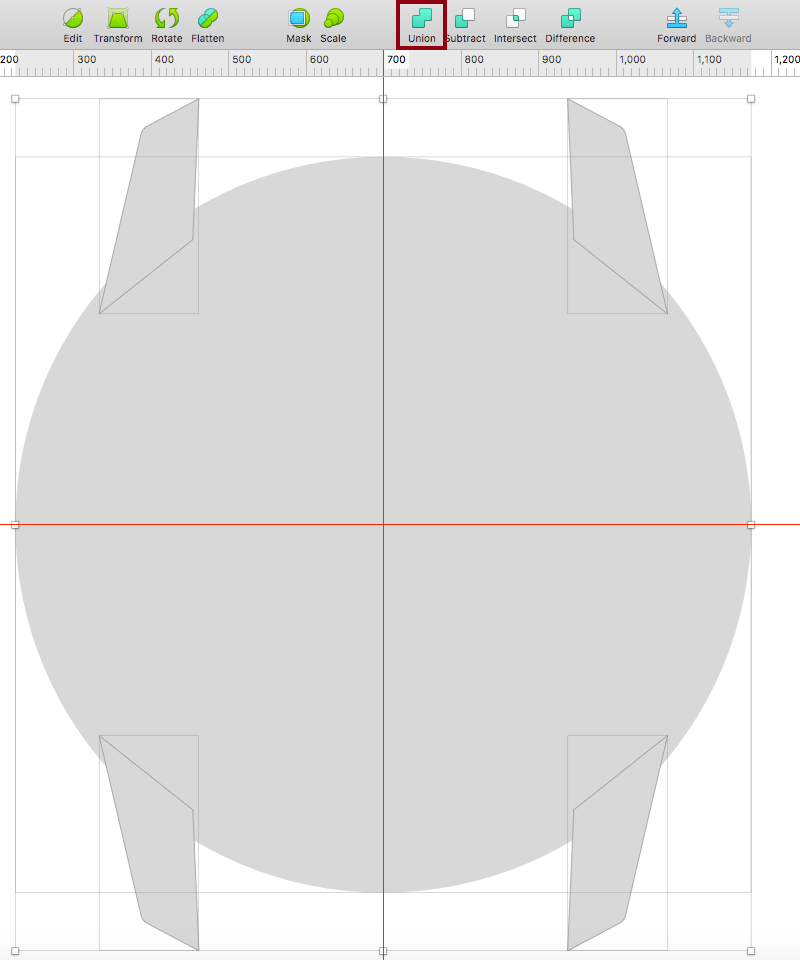
Duplicate both of these shapes, Flip Vertically, and move them to the bottom part of the circle, as shown in the image below. Hold Alt, point to the horizontal guide with the mouse, and use the arrow keys to move the shapes until they are the same distance from the center, like the top lugs.
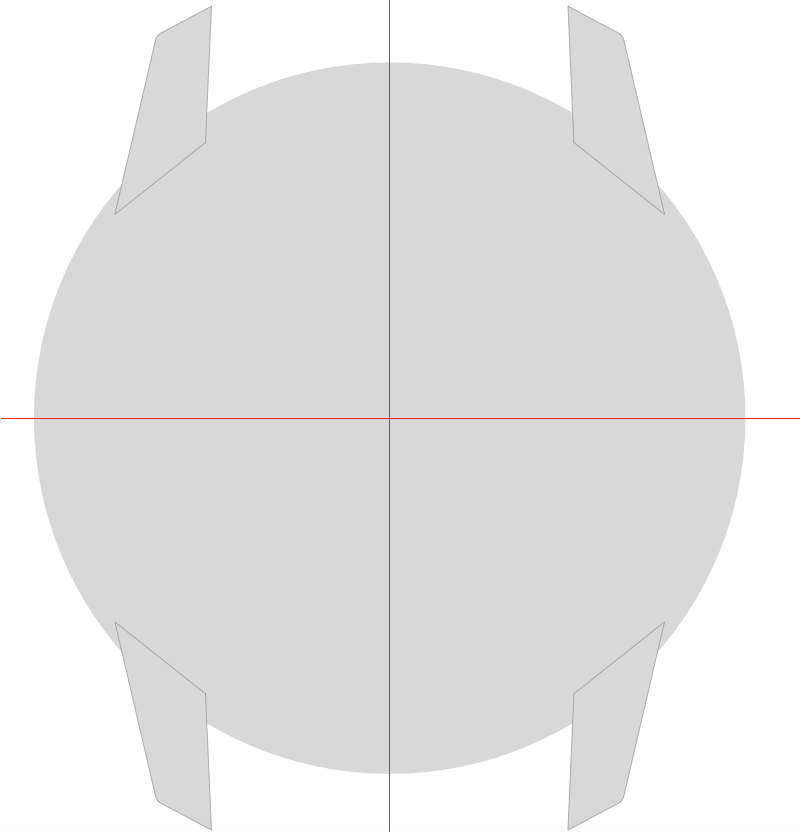
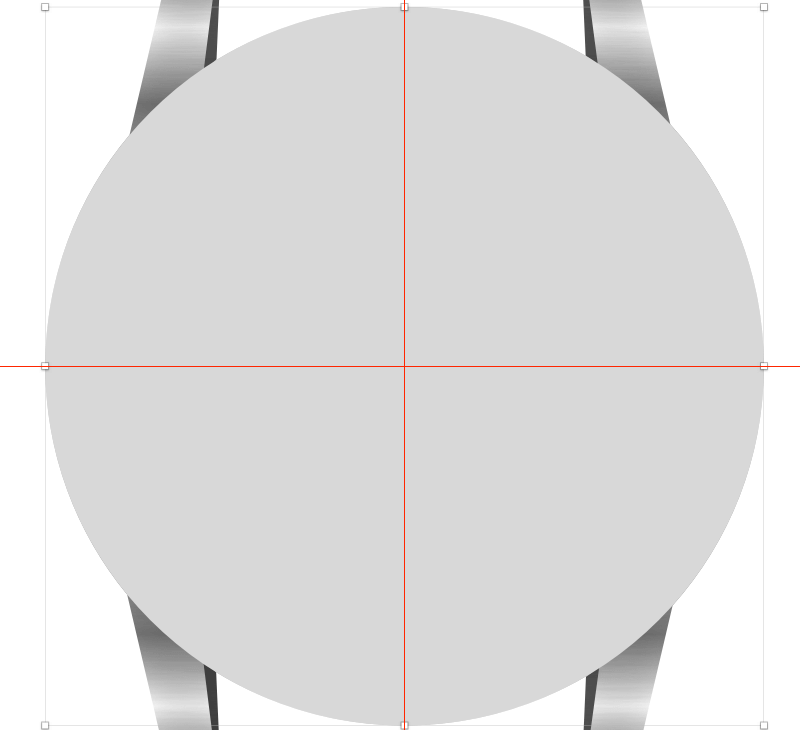
Now, select all shapes, including the circle, and simply merge them into one shape using the Union operation from the top toolbar; give the resulting shape the name case. Duplicate this shape, because we're going to use it later to add texture, and hide it by clicking on the eye icon next to the layer's name, in the Layers panel.
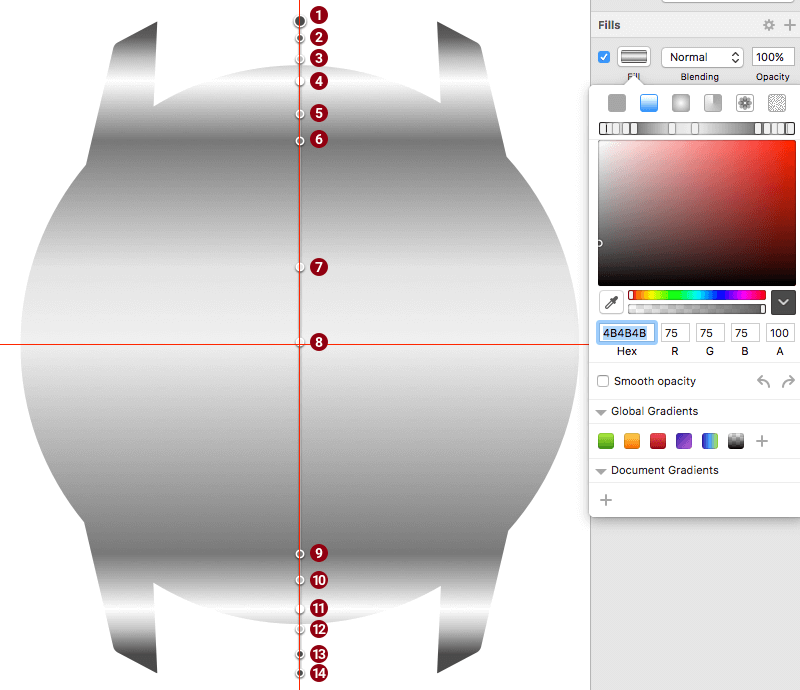
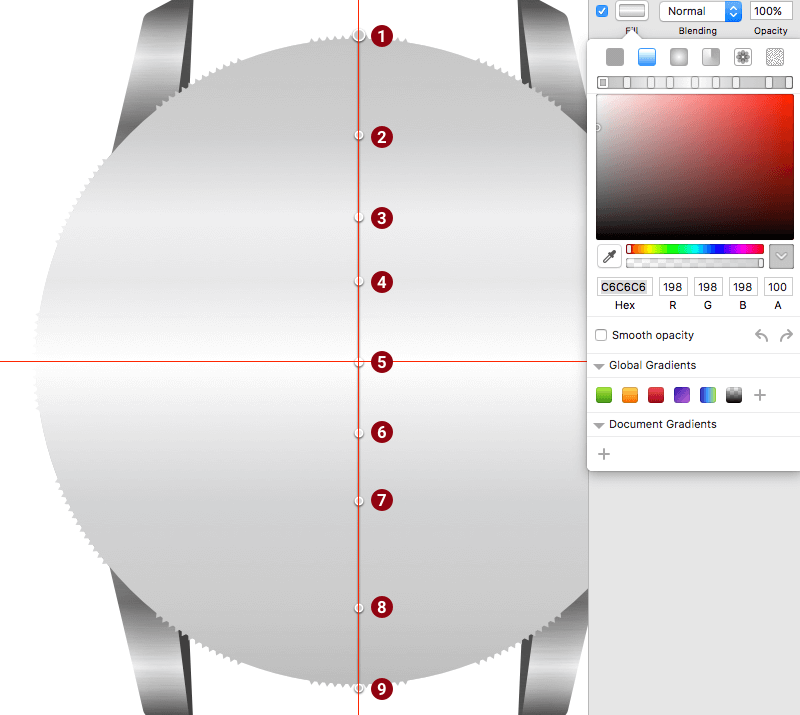
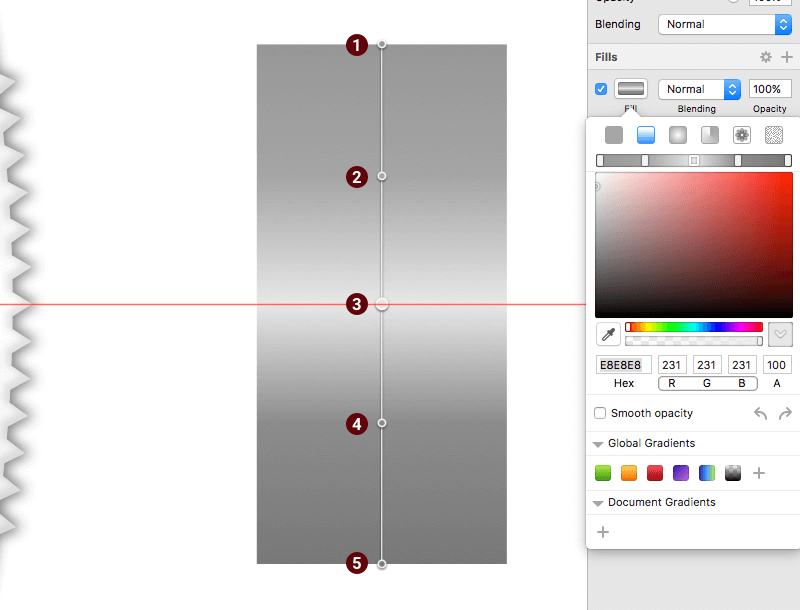
It's time to add some style to our case, to give it a metallic appearance. Turn off the Borders, then click on Fill, choose Linear Gradient, and add a gradient. Color steps can be added by clicking on the gradient line directly on the shape. The gradient properties are, from top to bottom:
-
#4B4B4B -
#5F5F5F -
#BEBEBE -
#FFFFFF -
#B5B5B5 -
#787878 -
#E4E4E4 -
#F0F0F0 -
#787878 -
#B5B5B5 -
#FFFFFF -
#C4C4C4 -
#4B4B4B -
#4B4B4B
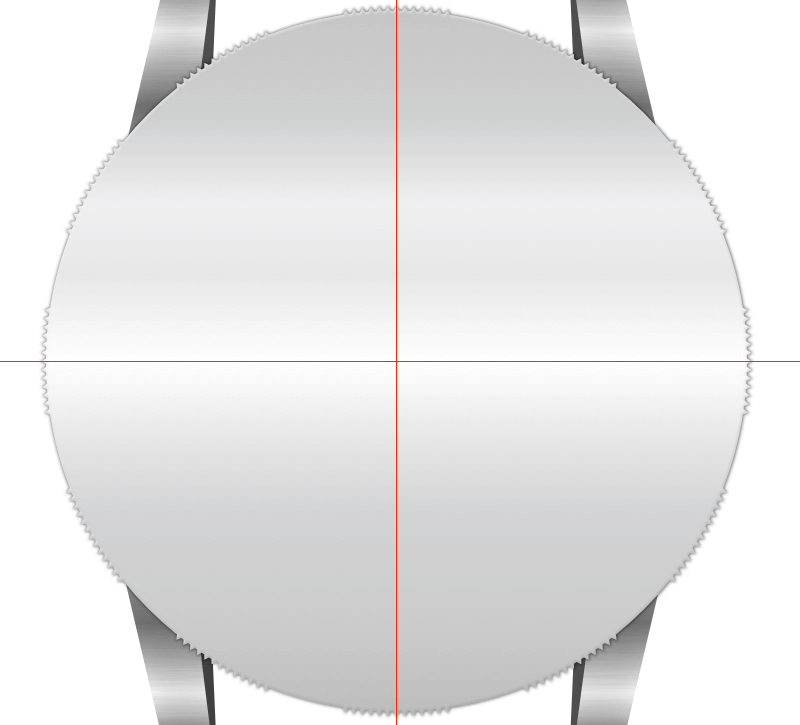
Using the Vector tool (V), draw four triangles over each lug, from the inner side, to add some depth to the case. For the color, use #545454, and turn off the borders. Use the image below as a reference.
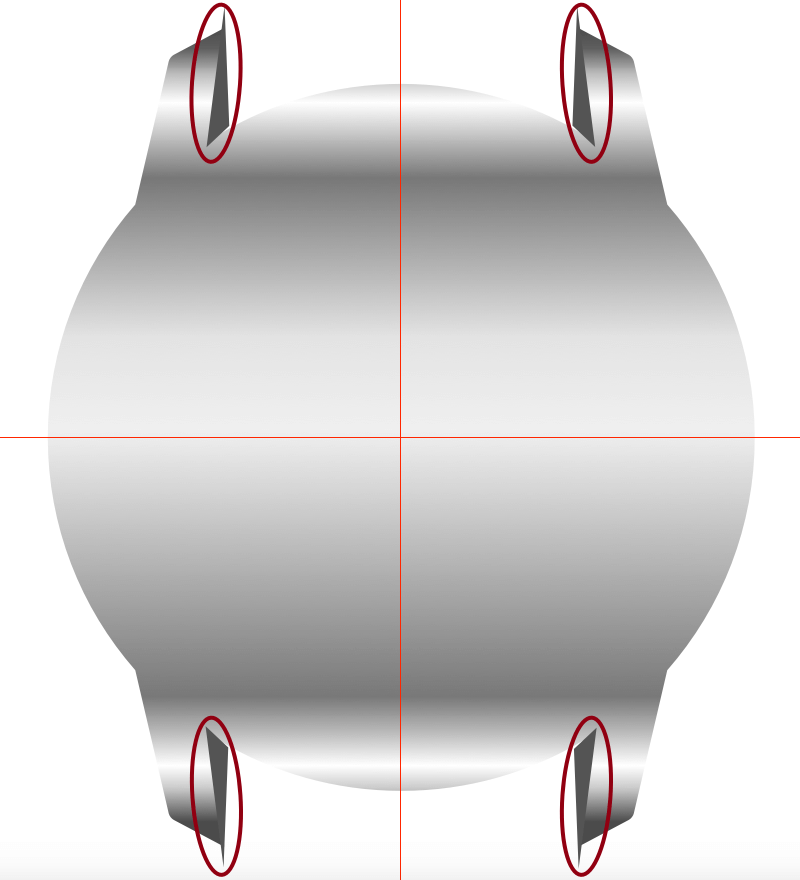
Let's fit the triangles inside the case. Select the case shape and all four rectangles, and click on Mask in the top toolbar. The result of this masking operation will automatically be placed in a new group in the Layers list. Change the name of this group to case.
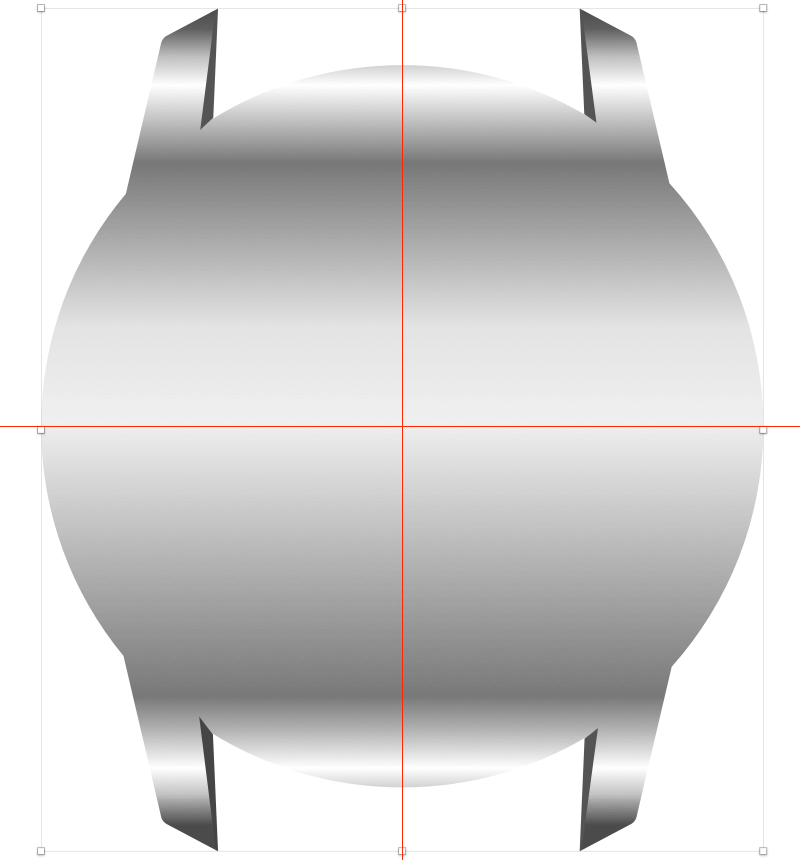
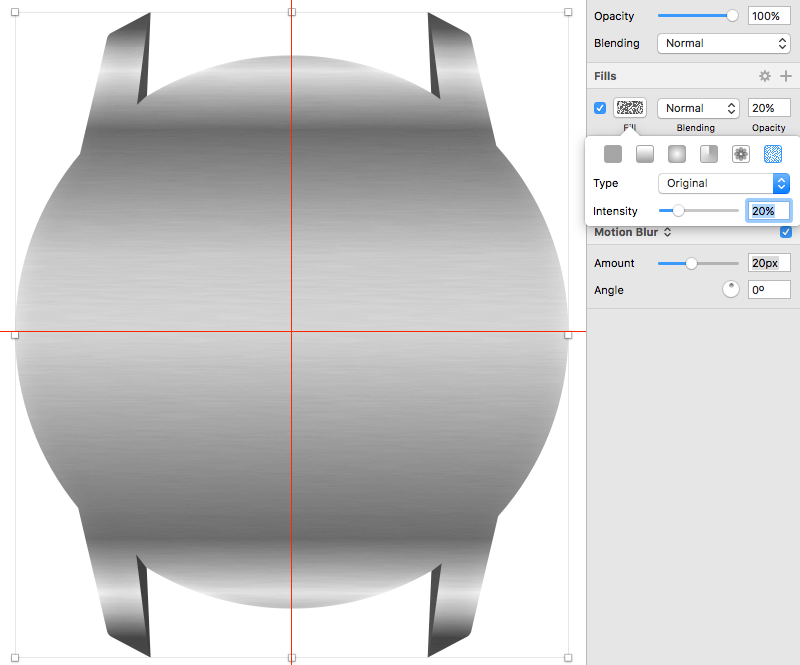
Remember the copy of our case shape? Unhide it, and move it into the case group, as the top layer. Click on Fill and choose Noise Fill, set Intensity to 15%, and apply Motion Blur with an Amount of 20px, to create a brushed metal texture.
The Bezel
Let's move on and create the bezel. The bezel is made of two rings: an outer with toothed edging, and a black inner with digits and minute marks.
Toothed Edged Outer Ring
First, we will create an outer ring with toothed edging. Draw a circle from the center of the artboard, with a diameter of 950px. Turn off the borders.
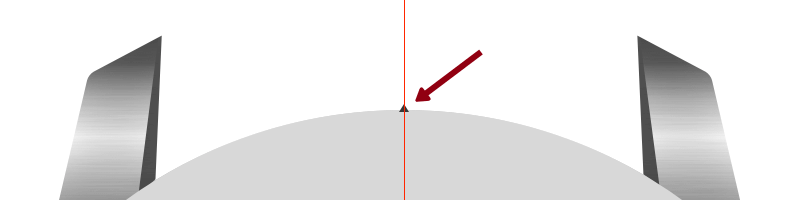
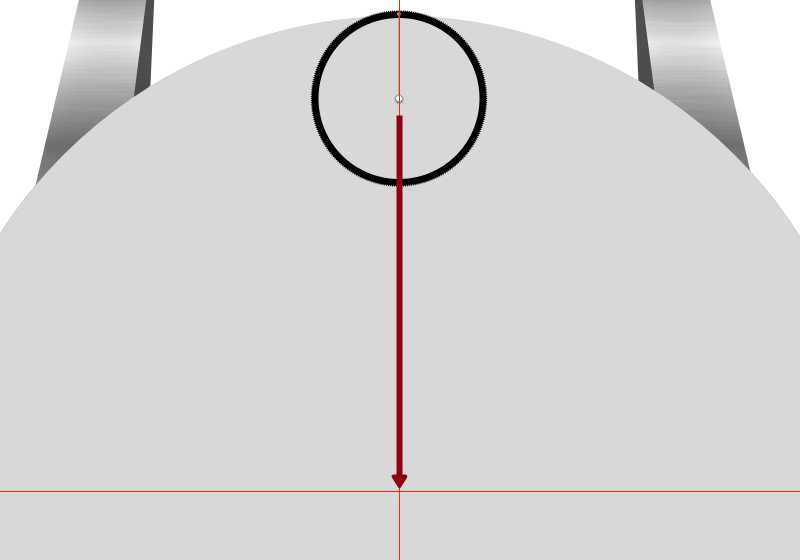
To create the toothed edging, first create a small triangle, 10px by 8px, using Triangle from Insert → Shape in the menu bar. Click on the Center Align icon in the Inspector panel to align the triangle to the center of the artboard and the circle (since everything is in the center of the artboard), and make sure that its downside overlaps with the circle, and turn of the borders.
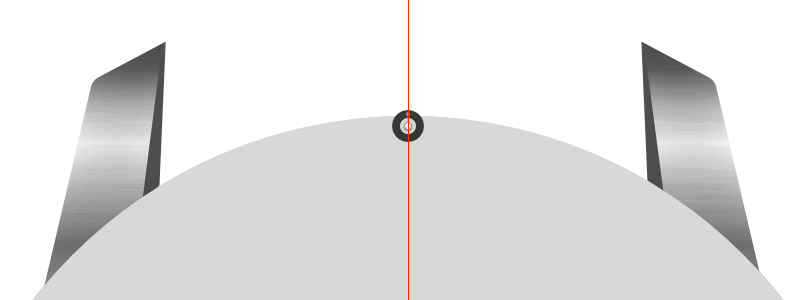
We need those triangles around the circle, and it would be a very time-consuming (and complex!) task to manually create and rotate each and every triangle. Luckily for us, Rotate Copies — a magnificent feature that can do both at the same time — has come to the rescue. So, select the triangle, and choose Rotate Copies from Layer → Paths in the menu bar. The following dialog will let you define how many additional copies of the selected element to make. Enter 259; so, in total, we will have 260 triangles around the circle that will be the toothed edge. After you have entered this value and confirmed the dialog, you will be presented with all of the triangles and a circular indicator in the middle.
Note: Performing this step is very CPU- and memory-intensive. If you are working on a modern machine, you probably will not experience any issues; but if your Mac is a bit older, then your mileage may vary. In general, when working with a large number of copies, try to turn off borders to avoid getting stuck and to achieve the result of the operation faster.
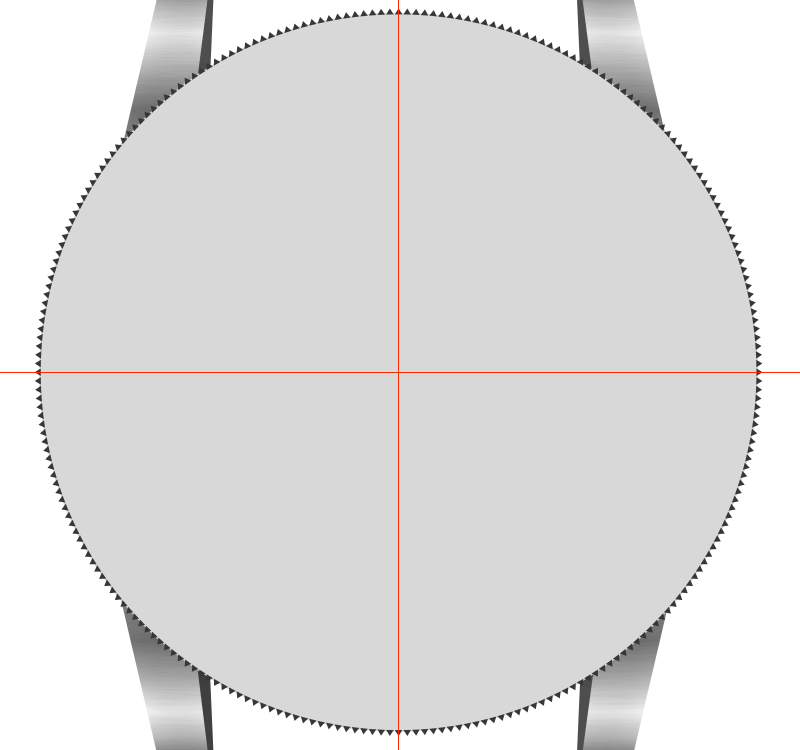
Move the indicator down until it is at the intersection of the guides — and voilà! we have 260 triangles around the circle. Please note that if you miss putting the circular indicator (the center of rotation) right at the intersection of the guides, the triangles won't be placed perfectly around the circle, and you won't be able to alter their position anymore as soon as you click anywhere else on the canvas; but it will still be possible to change the individual elements after accessing the related Boolean group.
Performance tip: Alternatively, you can perform this step in two passes, which will be a much less CPU-intensive task for your Mac. First, enter 129 for the additional copies; so, in total, you will have 130 triangles around the circle. Move the indicator down until it is at the intersection of the guides. Second, duplicate (Cmd + D) this shape, and then, using Rotate from the top toolbar, rotate it by 4 degrees. Finally, select both shapes and merge them into one using Union from the top toolbar.
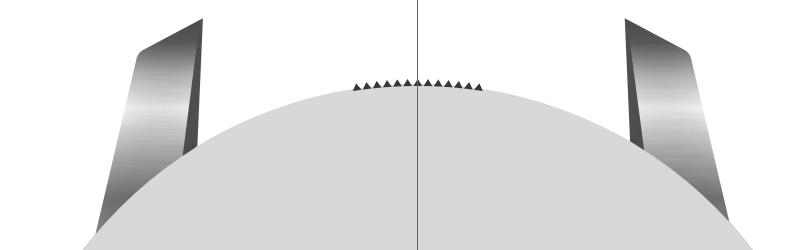
Now, go inside this Boolean group and erase all triangles except the central one at the top and the six to the left and right of its sides.
Use Rotate Copies again, but this time we need 11 additional copies. Align the circular indicator to the intersection of the guides.
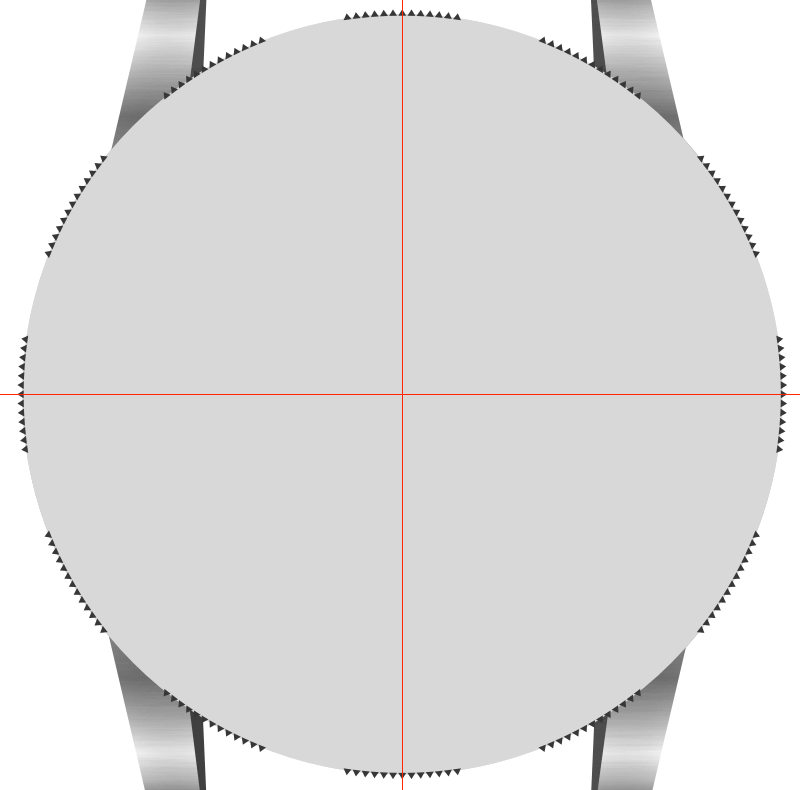
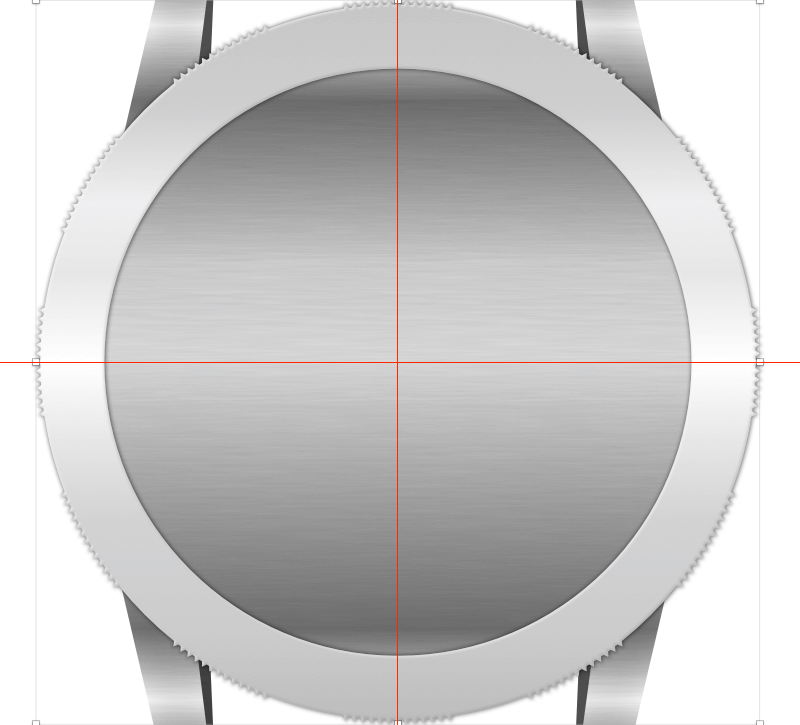
Select the resulting Boolean group and circle, and perform a Union operation. Name the resulting object outer bezel, and apply the following styles.
First, a Gradient fill:
-
#C6C6C6 -
#CFCFCF -
#EFEFF2 -
#E7E7E7 -
#FFFFFF -
#E7E7E7 -
#D2D3D5 -
#CBCBCB -
#CBCBCB -
#BCBCBC
We will now use Inner Shadows and Shadows to make it look slightly raised.
Let's add a light Inner Shadows effect with the following properties:
- Color:
#FFFFFF - Alpha:
50% - X:
1; Y:1; Blur:2; Spread:1
Then, add a dark Inner Shadows effect:
- Color:
#000000 - Alpha:
10% - X:
-1; Y:-1; Blur:2; Spread:1
Finally apply Shadows effect:
- Color:
#000000 - Alpha:
50% - X:
0; Y:0; Blur:4; Spread:1
This is what the outer bezel looks now with all of the styles applied.
To make this a ring, we need to make the hole in the middle. Draw a circle in the middle of the artboard, with a diameter of 780px, select "outer bezel" and this circle, and simply apply a Subtract operation from the top toolbar. Name the resulting shape outer ring.
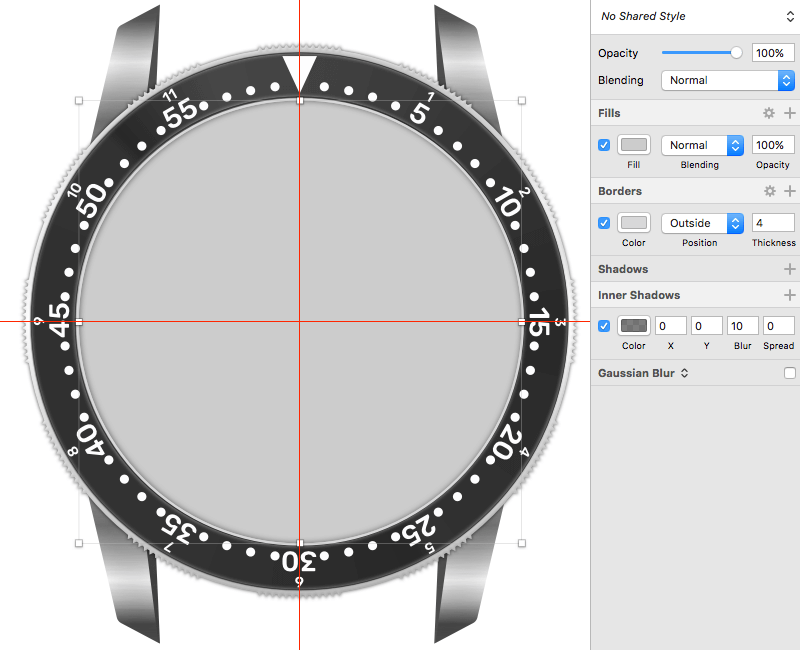
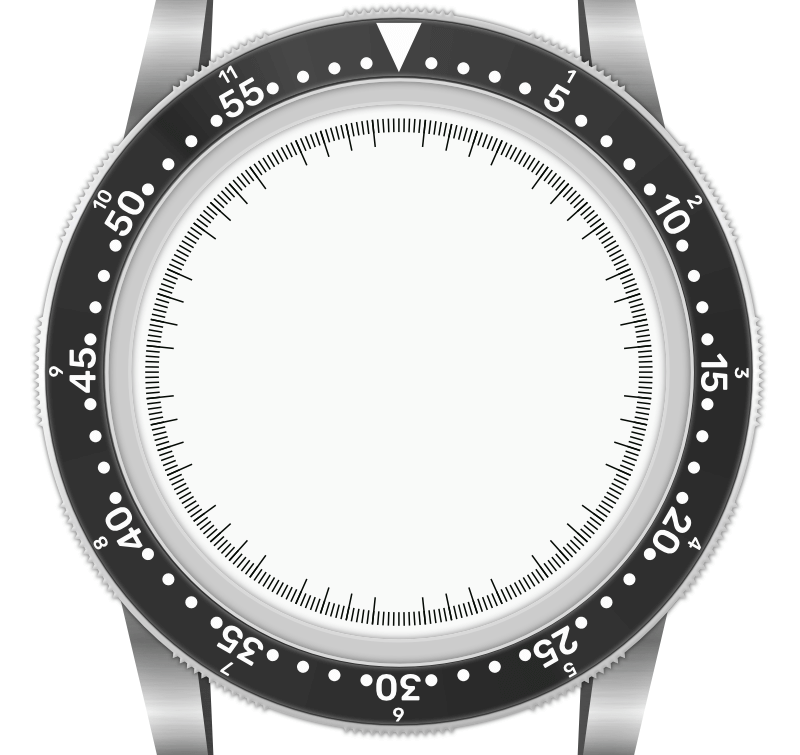
Black Inner Ring
For the inner ring, first draw a circle from the center, with a diameter of 930px. Add an Outside border with a Thickness of 1 and the Color set to #313131.
Next, change Fill to Angular Gradient, and adjust the gradient with the following parameters:
-
#303030 -
#343434 -
#282828 -
#484848 -
#292929 -
#333333 -
#282828 -
#343434
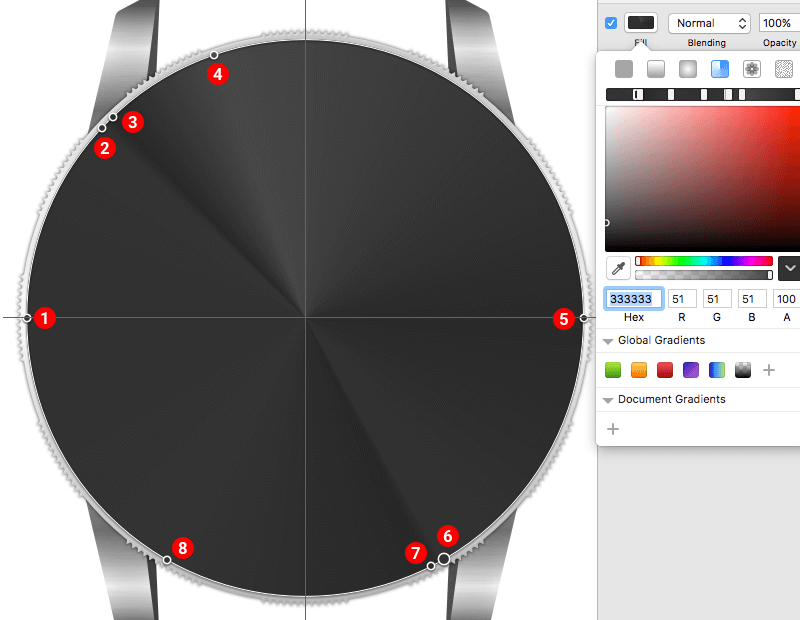
To add subtle 3D look, add Inner Shadows, with the Color set to #FFFFFF at 30% alpha. Set Blur to 4, Spread to 2 and both the X and Y positions to 0. Then apply Shadows, to make it look raised a bit. Set Color to #000000 at 50% alpha, Blur and Spread to 1 and the X and Y positions set to 0. Name this shape inner bezel.
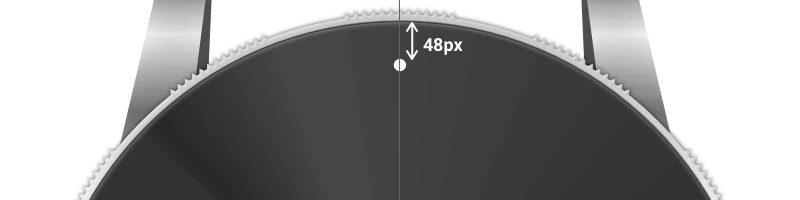
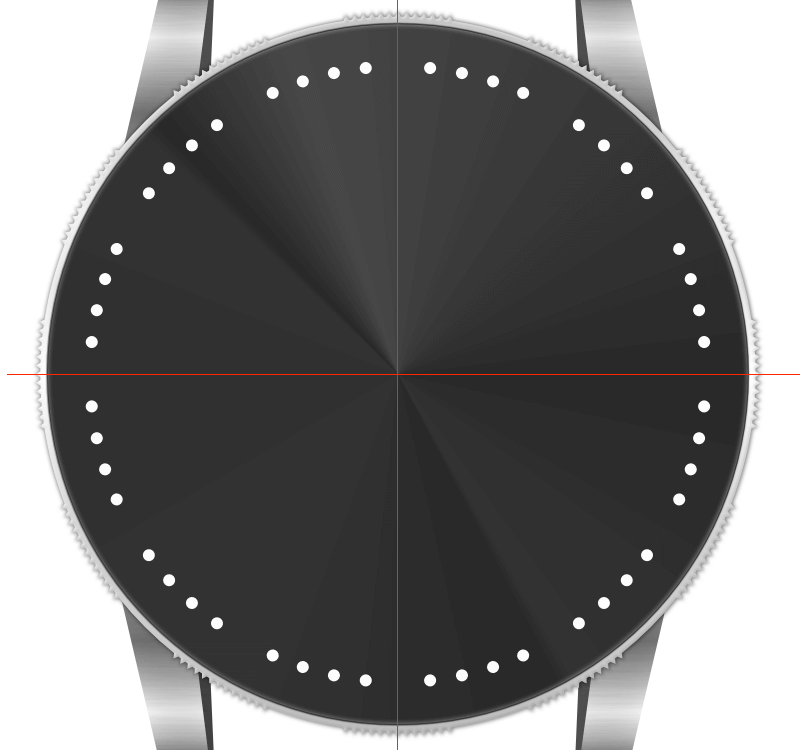
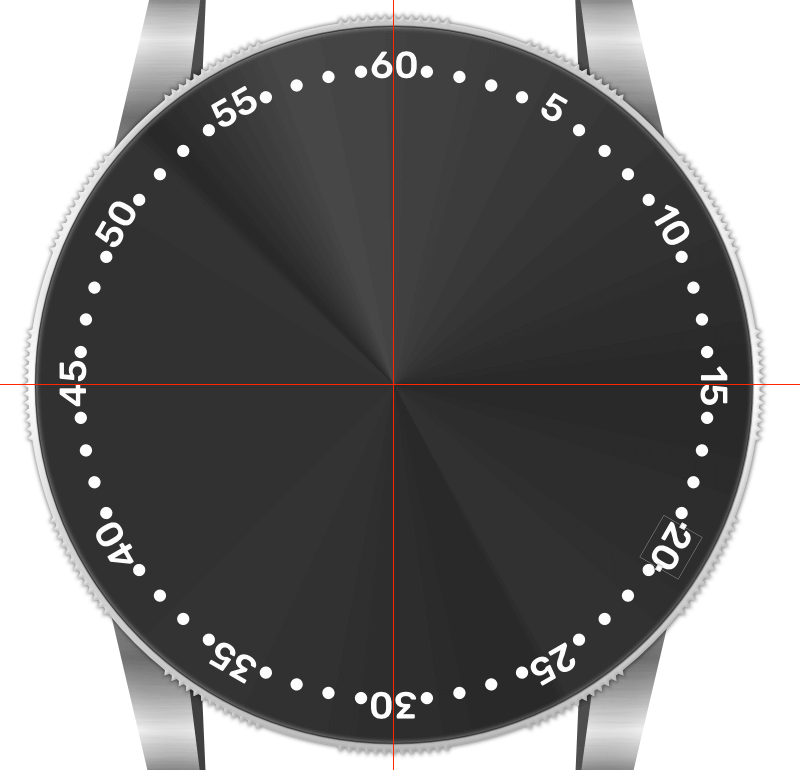
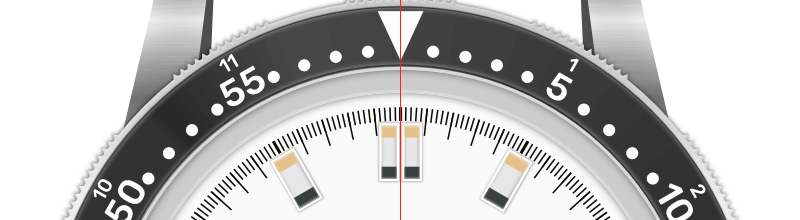
We have two scales on our inner ring: the minute and hour scales. Let's deal with the minute scale first. The minute scale consists of minute marks and numerals at five-minute intervals. We will use circles for the minute marks. So, draw a circle with a diameter of 16px, set Color to #FDFDFE, and turn off the borders. Move it away 48px from the outer edge of the inner ring. Hold the Alt key, point to the circle with the mouse, leave it there, and use the arrow keys to reposition the shape until the spacing is correct. Center it to the artboard and inner ring using Center Align from the Inspector panel.
We actually need 59 more of these marks, so go to Layer → Paths, select Rotate Copies, enter 59 in the dialog box, click OK, and align the circular indicator to the intersection of the guides. Rename this resulting shape to minute marks, and delete every fifth mark, starting from the top-middle one.
Let's add minute numerals at those five-minute positions. Unfortunately, we can't use "Rotate Copies" to distribute text layers, so we will need to position them manually. For the numerals, we will use the slightly rounded Rubik font family from Google. Add the "60" at the top, with a font size of 49, a Medium weight, Center alignment, and a #FDFDFE fill. Move it 20px away from the outer edge of the inner ring, and center it to the inner ring horizontally. Now, duplicate this number by pressing Cmd + D on the keyboard, and select Rotate from the top toolbar. Because we need to rotate the numbers around the center of our artboard, click and drag the crosshair marker to the intersection of the guides, and rotate it 30 degrees. Continue duplicating and rotating each number one after another, without letting the selection go. That way, the anchor will stay in the middle and you won't have to move it every time.
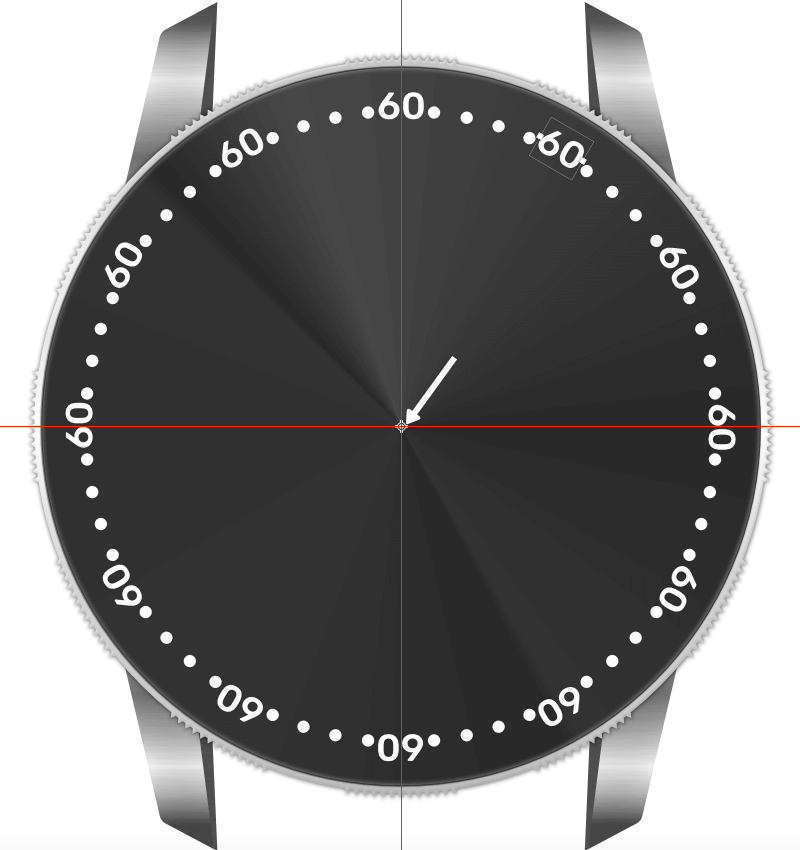
Finally, edit the numbers one by one, and change the digits to the corresponding minute marks.
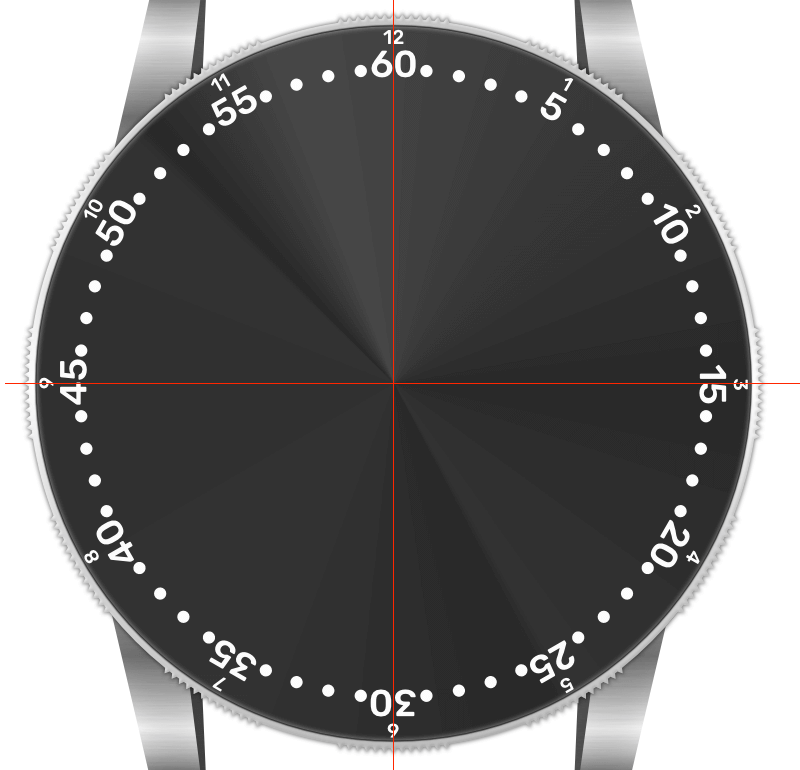
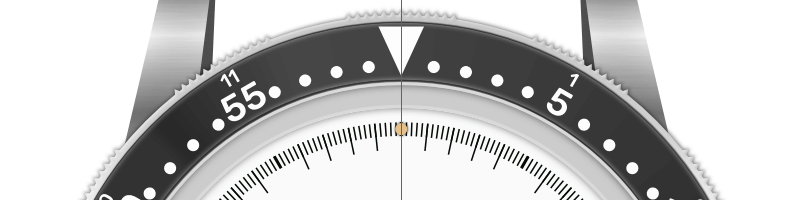
Next, add the hour scale above the minute scale. First, duplicate the number "60," change the font size to 26 and the number to 12, and move it up using the arrow keys so that it's 1px away from the outer edge of the inner ring. Now, using the method explained above, add the remaining hour numerals.
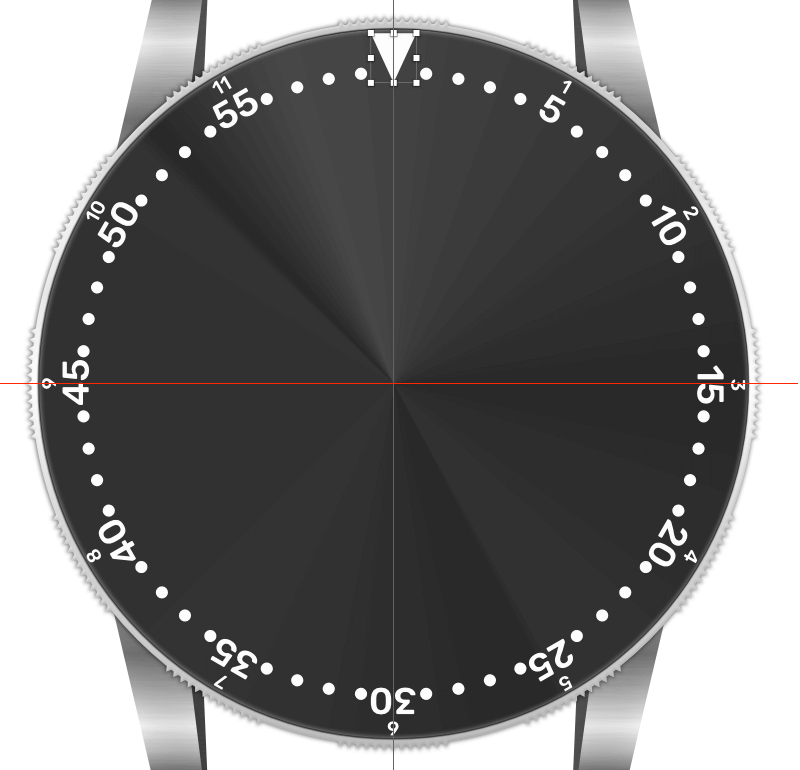
Let's finish the inner ring markings by adding a triangle at the 12-hour position. First, delete the "60" and "12" numbers from both scales, select the Triangle tool from Insert → Shape, and draw a 60px by 65px triangle. Move it 5px away from the outer edge of the inner ring, and center it to the inner ring horizontally. For the color, use the same color that we used for the marks and digits — #FDFDFE — and turn off the borders.
We also need to create the hole in the middle, just like we did for the outer ring, to make it look like the real ring. So, draw a circle in the middle of the artboard with the diameter of 780px, select inner bezel and this circle, and perform a Subtract operation from the top toolbar. Name the resulting shape inner ring.
Select all of the bezel layers, and place them inside the group rotating bezel.
The Dial
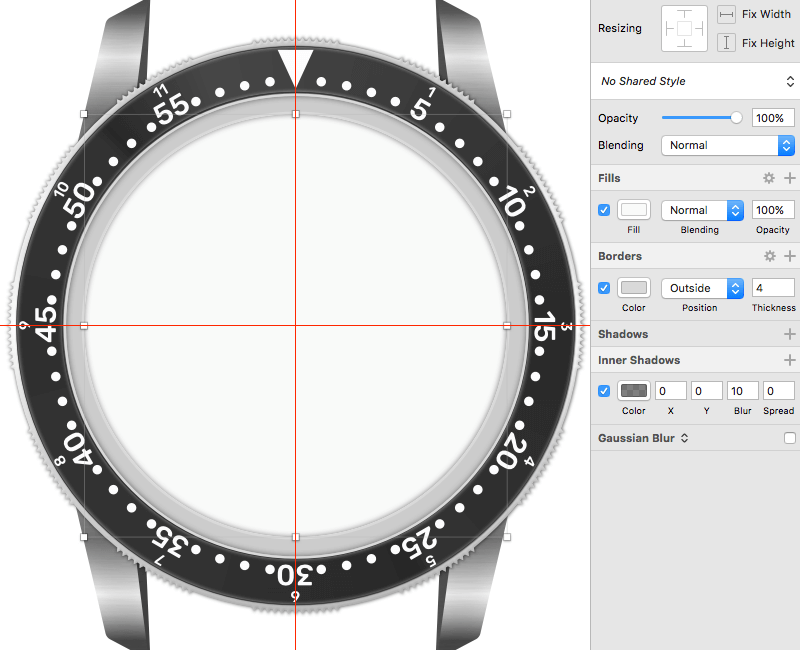
It's time to work on the dial. First, we will create the outer ring of the dial.
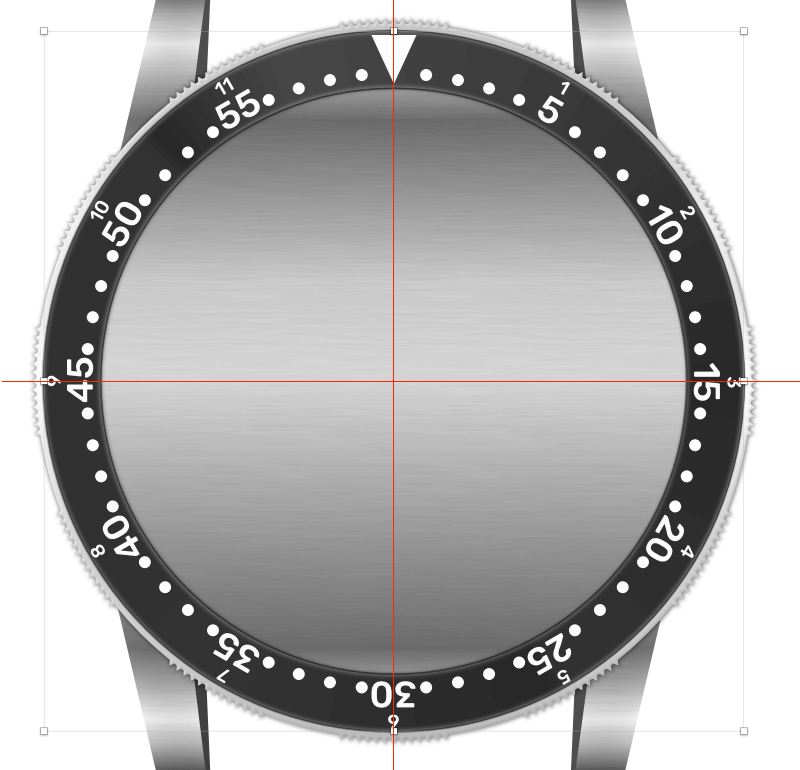
Switch to the Oval tool (O), and create a circle in the middle of the artboard, with a diameter of 768px. Set Fill to #CCCCCC, and add an Outside border, with a Thickness of 4px and the Color set to #D9D9D9. Also, apply Inner Shadows, with the Color set to #000000 at 50% alpha and the Blur set to 10. Name this shape outer dial.
For the base of the dial, create a circle in the middle of the artboard, with a diameter of 706px, a Fill set to #FAFBF9 and an Outside border with a Thickness of 4px and a Color of #D9D9D9. Add Inner Shadows, with the Color set to #000000 with 50% alpha and a 6 Blur. Give this shape a name of inner dial.
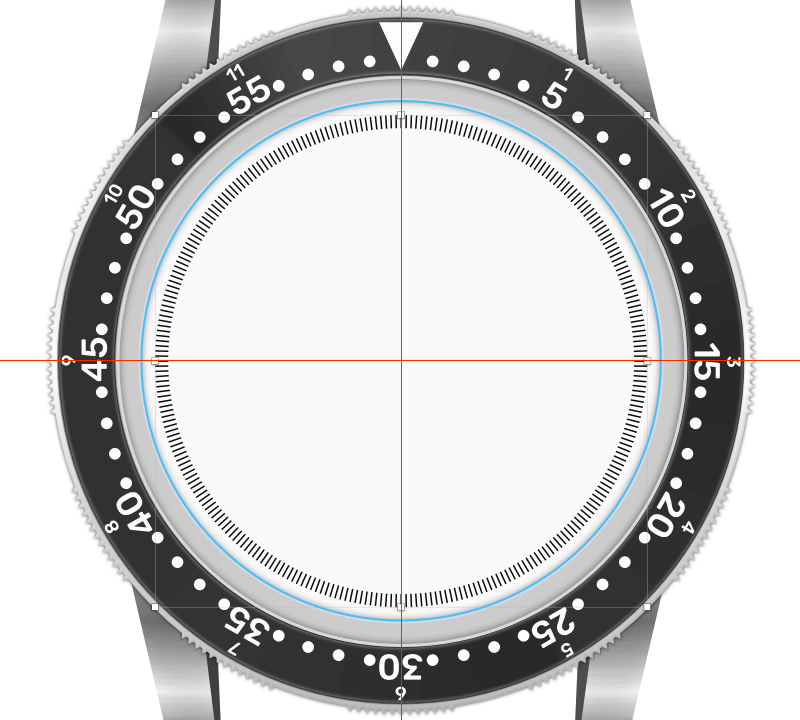
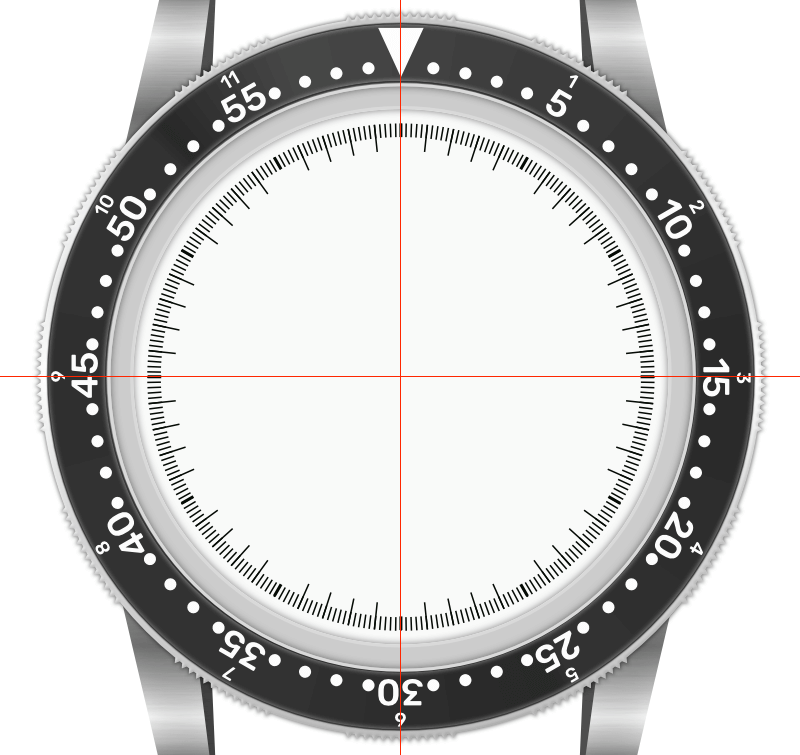
One-Fifth of a Second Scale
To break the ground, we'll add the scale for the one-fifth of a second, which means that 300 thin markings should line the outer rim of the dial. Create a rectangle with a width of 2px and a height of 18px, with the Fill set to #050B05 and the borders turned off. (Turning off borders will help avoid the Mac's spinning beach ball of death.)
Center the rectangle to the inner dial horizontally, and move it 19px away from the the outer edge of inner dial. Once again, we'll use "Rotate Copies" to create the scale. Go to Layer → Paths, select Rotate Copies, enter 299 in the dialog, click OK, and align the circular indicator to the intersection of the guides. Rename this resulting shape to one-fifth of a second scale.
60-Second Markings
Next, we'll add 60-second markings. These markings are the same as the "one-fifth of a second" markings but longer. So, create exactly the same rectangle as in the previous step, but make it 36px high, and position it the same way (19px from the outer edge and aligned horizontally to inner dial). Open the Rotate Copies, enter 59 in the dialog box, click OK, and align the circular indicator to the intersection of the guides.
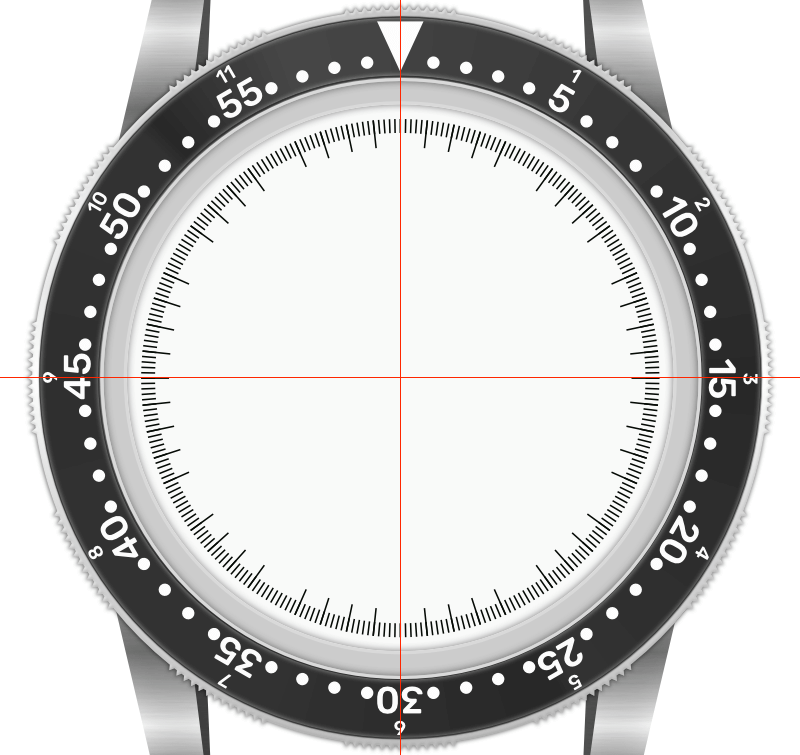
We don't need the marks at the hours' positions, so we will have to delete every fifth mark, starting from the one in the 12:00 position. You can also use a rotating bezel as a guide for which mark to delete.
Rename this resulting shape to 60 seconds markings.
Five-Minute Markings
Let's add the minute markings. Create a rectangle with a width of 4px and a height of 18px, with the Fill set to #050B05 and borders turned off. Center it to the inner dial horizontally, and move it 19px away from the outer edge of inner dial. Because we need 12 hour marks in total, go to Rotate Copies, enter 11 in the dialog box, click OK, and align the circular indicator to the intersection of the guides. Give this shape a name of 5-minute markings.
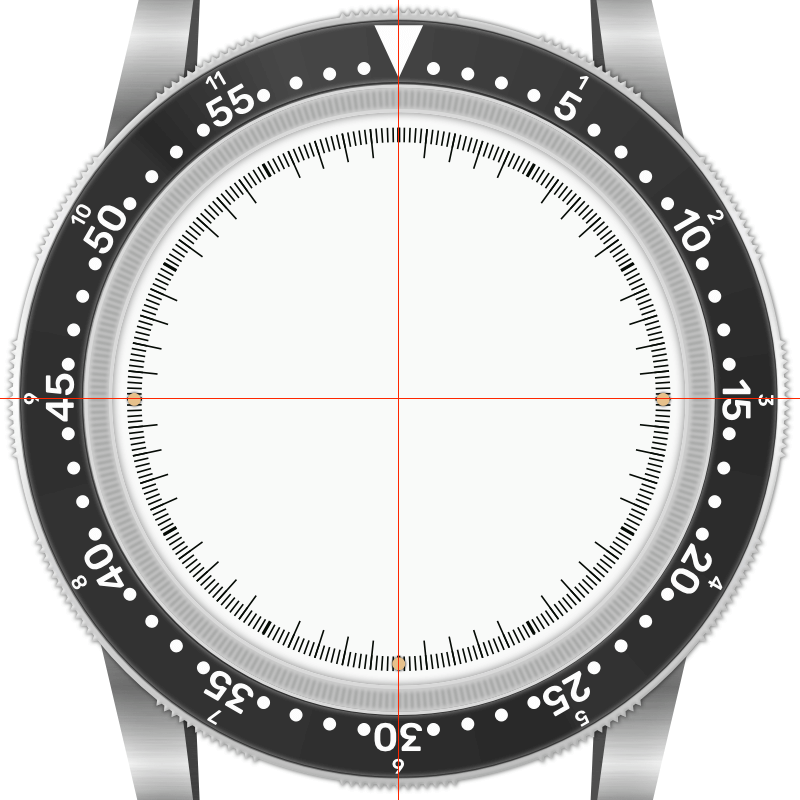
15-Minute Markings
For the 15-minute markings, we will use circles. Draw a circle with a diameter of 16px, align it horizontally with the inner dial, and move it 20px away from the top. Set its Fill to #E5BF8E, and add Shadows with the Color set to #000000 at 50% alpha, the Blur set to 2 and the Spread set to 1.
Use Rotate Copies to add circles at the quarter-hour positions. At the end, delete the one at the 12:00 position. Rename this shape to 15 minute markings.
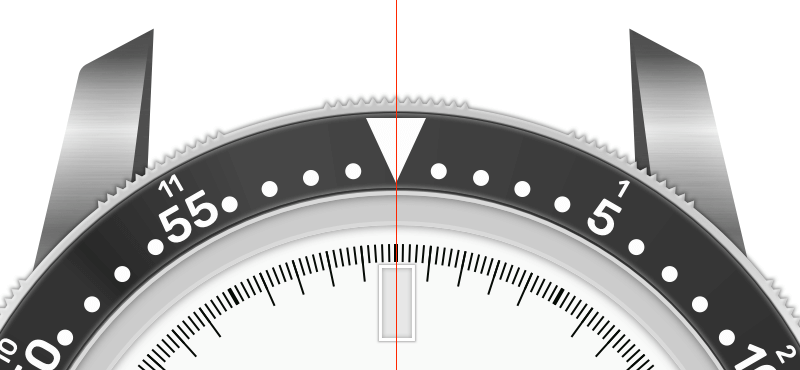
Hour Markings
In this step, we will create hour markings. Select the Rectangle tool (R), and create a rectangle with a width of 30px and a height of 70px, with the Fill set to #E7E7E7. Add an Outside border, with a Thickness of 3px and the Color set to #FFFFFF. Position it at 12:00, and move it 43px away from the the outer edge of inner dial. Apply Inner Shadows, with the Color set to #000000 with 30% alpha and a Blur of 5, and Shadows with the exact same color, a Blur of 2 and a Spread of 1, to make it look slightly raised from the inner dial. This will be the base of the hour mark.
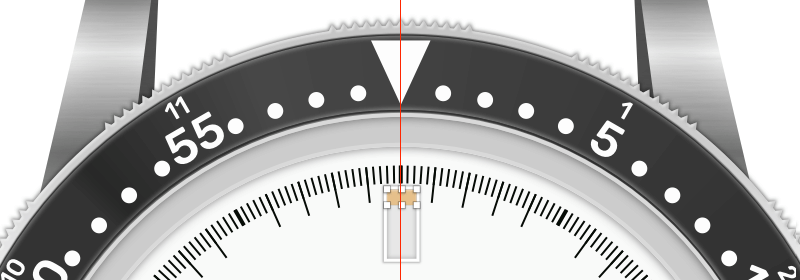
We need to add two smaller rectangles at the top and bottom to finish the hour mark. The easiest way to do this is to duplicate (Cmd + D) the rectangle, turn off borders and shadows, change the height to 16px and the Fill to #E5BF8E, and alter the Inner Shadows so that the Color is now set to #FFFFFF with 60% alpha, the Y to 1 and the Blur is 2.
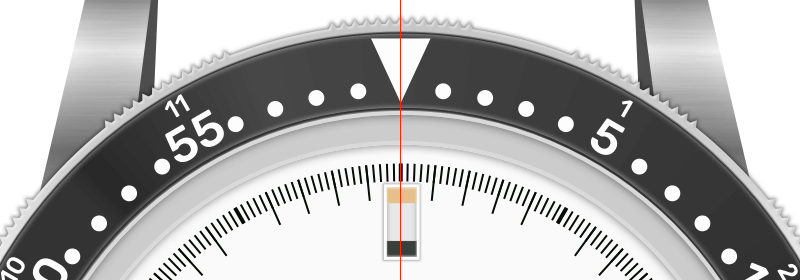
To add a rectangle to the bottom, duplicate the rectangle that we just created, Flip Vertically, change the Fill to #393F3B, and align it to the bottom of our base, by selecting both of these rectangles, right-clicking, and selecting Align Bottom. Finally, select all three rectangles and group them into an hour mark group using Cmd + G.
Duplicate the hour mark group and turn the duplicate into a symbol by right-clicking and selecting Create Symbol. Name this symbol hour-mark. Now we need to distribute hour-mark symbols around the dial. Select the hour-mark symbol, choose Rotate from the top toolbar, drag the crosshair marker to the center of the artboard (the intersection of the guides), and rotate it to the position of 1:00 (30 degrees). Continue duplicating and rotating the symbol (in 30-degree increments), without letting the selection go. Finally, delete the hour-mark symbols at the positions of 3:00, 6:00 and 9:00, since we won't need them.
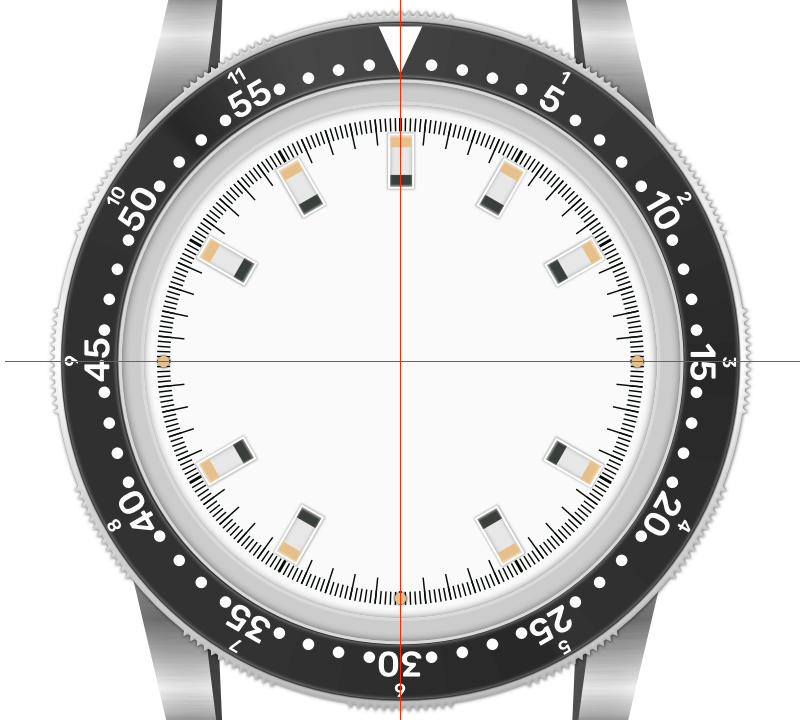
The hour mark at 12:00 needs to be a bit different, and it should consist of two narrower hour marks. This is why we kept the original hour mark group! We will simply modify the existing hour mark, by selecting all three shapes inside the hour mark group and changing the width to 20px from the Inspector Panel on the right. Next, duplicate this group, move it 9px to the right using the arrow keys; then, select both groups, and place them in a new group named 12-hour mark; align them horizontally with the inner dial. Lastly, select all hour marks and put them in the hours group.
Please note that the same can be done with symbols as well, because they can be resized while keeping the internal spacing intact.
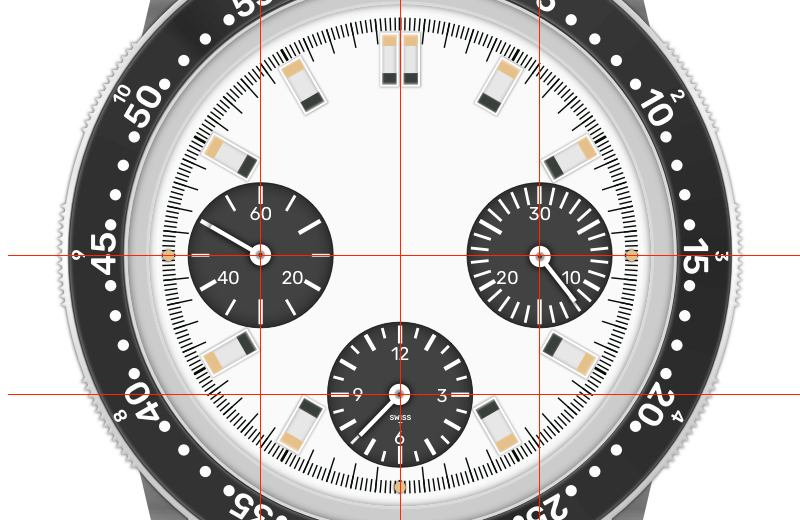
Subdials
Subdials give information not provided by the main watch dial, and they are common features of chronograph watches. Chronographs use subdials to keep track of seconds and of elapsed minutes and hours. In this step, we will create three subdials: an active seconds subdial, a 30-minute counter and a 12-hour counter.
Active Second Subdial
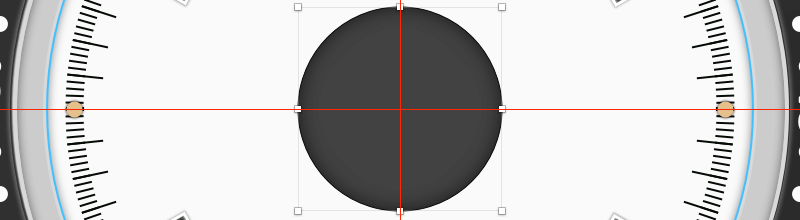
This subdial shows continuously running seconds. Let's start by drawing a circle from the center of the artboard (i.e. the intersection of the guides), with a diameter of 204px. Add a Center border with a Thickness of 1 and the Color set to #424242. Apply Inner Shadows with the Color set to #00000 at 60% alpha and the Blur set to 20, to make it look like it's inserted in the main dial. Name this shape subdial base.
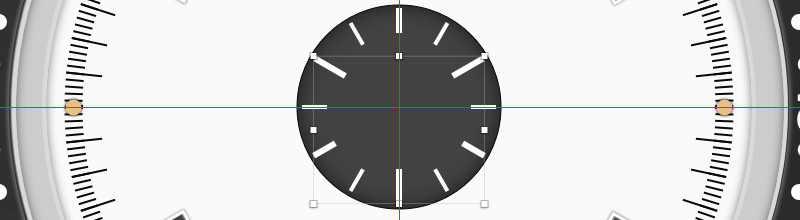
Let's add the markings. First, we will add tiny markings. Create a white rectangle with a width of 4px and a height of 25px and the borders turned off. Align it horizontally to the subdial base, and position it 5px away from the top of the subdial base. Use Rotate Copies to create a 12-marking scale. This subdial has tiny markings at five-second interval, so we need to delete every second marking, starting from the top one (at the 60-second position).
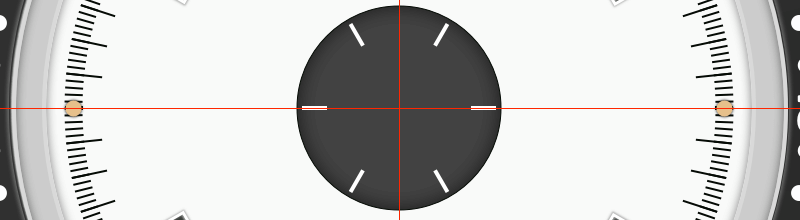
Next, we need to add a bit bolder markings at the 60, 20 and 40 positions. Create a rectangle like the previous one, but make it a bit wider: 6px in width and 25px in height, and at the same position. Open Rotate Copies and create a three-marking scale.
Let's add the remaining three markings at the 10, 30 and 50 positions. Create a rectangle like the previous one, but make it a bit longer, 6px in width and 35px in height, and position it 5px away from the bottom of the subdial base. Open Rotate Copies and create a three-marking scale.
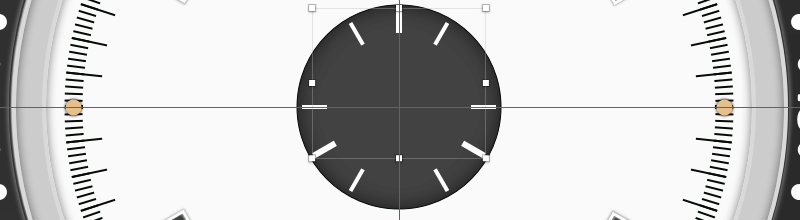
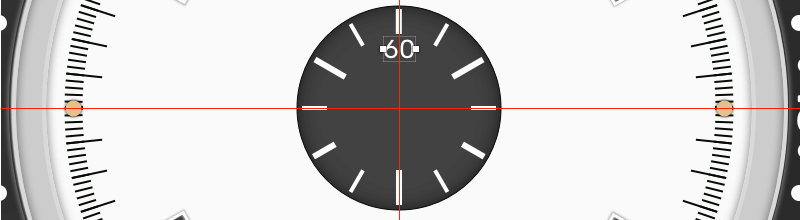
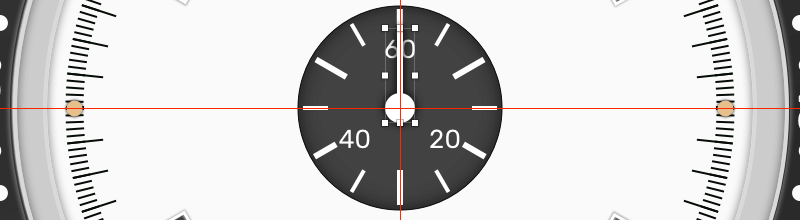
Now, we need to add numbers to the subdial. Add the 60 at the top; for the font, use Rubik again, with a font size of 26, a Regular weight, Center alignment and a #FFFFFF fill. Move it 30px away from the outer edge of subdial base, and center it horizontally.
Duplicate this number. Select Rotate from the top toolbar, drag the crosshair marker to the intersection of the guides, rotate it 120 degrees, and change the number to 20. But we don't want the number to be rotated this way; it should stay normal, like the 60. To do that, set the Transform to 0 in the Inspector Panel on the right. Now, use the arrow key to move the number away from the marking, to the left by 6px (press the left arrow key six times).
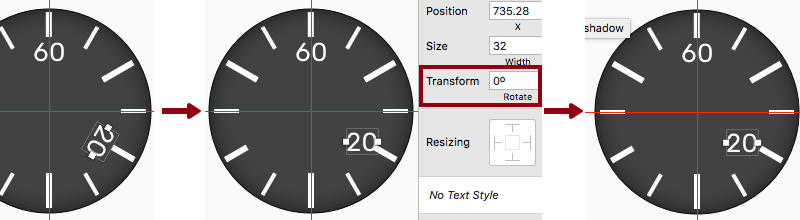
Using the same method, add the number 40 at the 40-seconds position, but this time move the number 6px to the right.
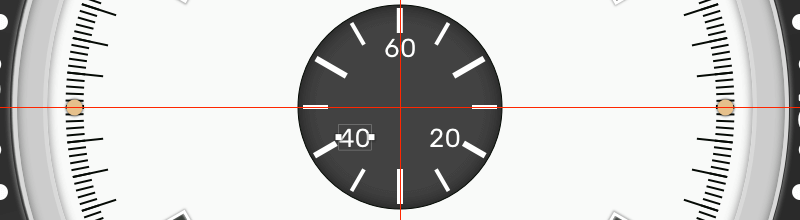
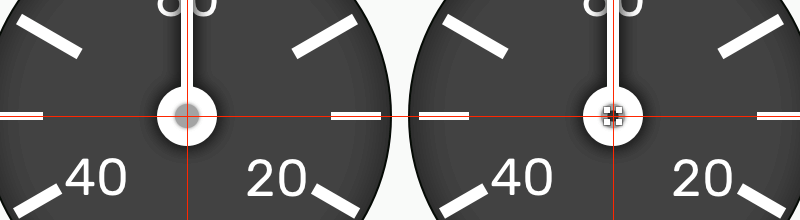
Let's add a hand to finish the subdial. First, draw a white circle from the middle of the artboard, with a dimeter of 30px and borders turned off. Then, draw a white 6px by 68px rectangle, and Align Horizontally with the circle we've just created, making sure they overlap. Select both shapes and perform a Union operation to create one object. Add Shadows with the Color set to #000000 with 70% alpha, the Blur set to 8 and a Spread of 2, to raise the hand from the subdial.
Create a small circle on top, with a diameter of 12px. Set the Fill to #A3A3A3, turn off borders, and add black Shadows with 50% alpha and a Blur of 2. Now duplicate this circle, turn off Shadows, change the Fill to #353535, and scale it down to 50%. These two circles will represent a small screw to keep the hand in place. Group all shapes for the hand, and name this group hand.
Select all of the shapes that we used to create the subdial, and group them into the subdial group. We will use this group as a base to create all three subdials.
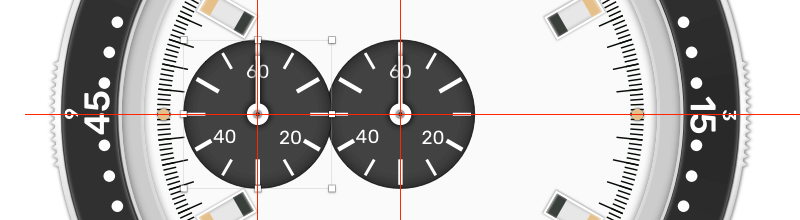
Now, duplicate the group and rename it to active second subdial, and then move it to the 9:00 position. Using the left arrow key, move the subdial to the left until it's 55px away from the left edge of inner dial. Add the vertical guide at the center (504px) of active second subdial. This will help us to adjust the position of the hand. Use a simple math operation to determine where the vertical center is: The subdial's diameter is 204, so the radius is 102px — just add 102px to the current X position in the Inspector Panel on the right.
30-Minute Counter
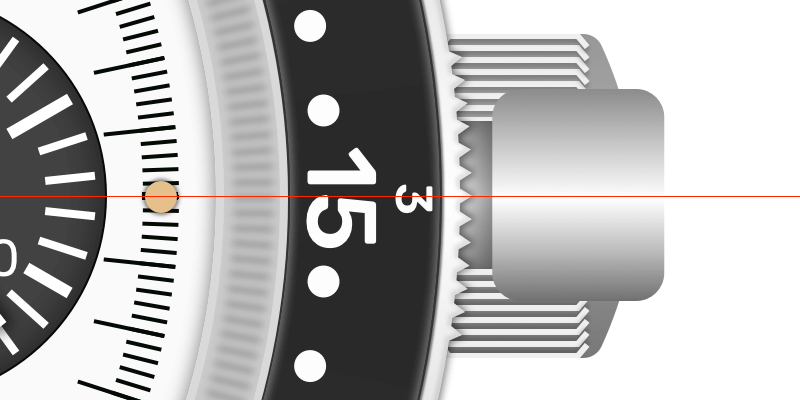
This subdial is used to record events longer than one minute (and lasting up to 30 minutes) and it's placed on the right side of the dial, at the 3:00 position.
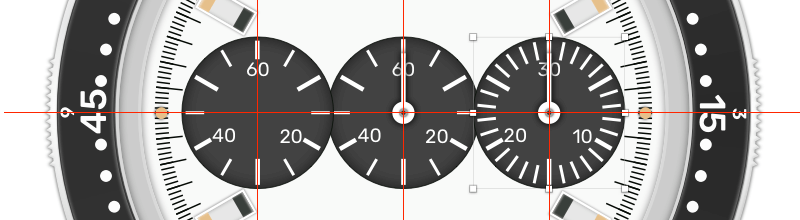
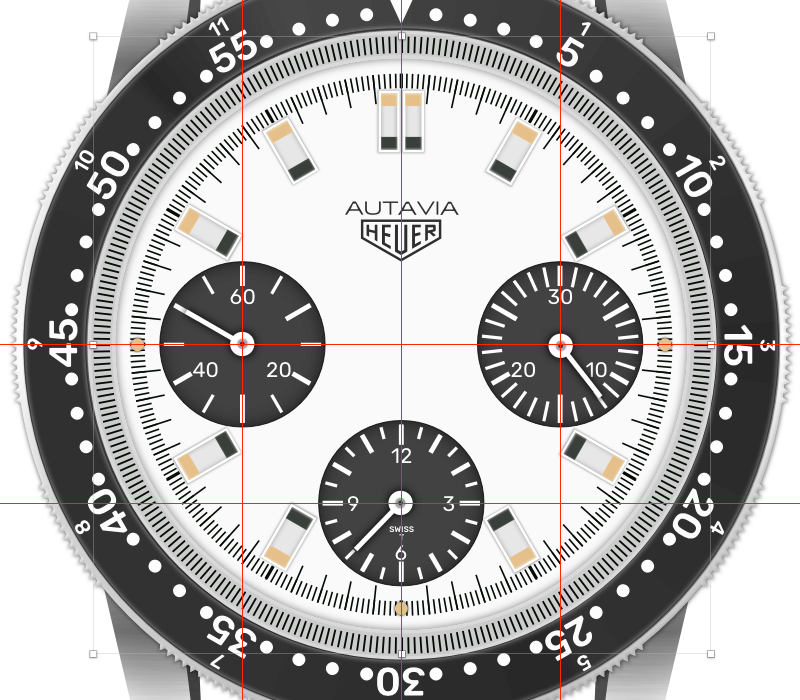
We'll be using the subdial group as the base for this one, so duplicate the subdial group, rename it to "30 minute counter" and alter it a bit. Delete the tiny markings scale. Create a new one, in the same way we did above, but with 30 markings. Go into this new scale and delete markings that are in the same positions with the bold markings, and then change the numbers to 30, 10 and 20. Move this subdial to the right until it's 55px away from the right edge of inner dial, and then add the vertical guide at the center (896px). Use the image below as a reference.
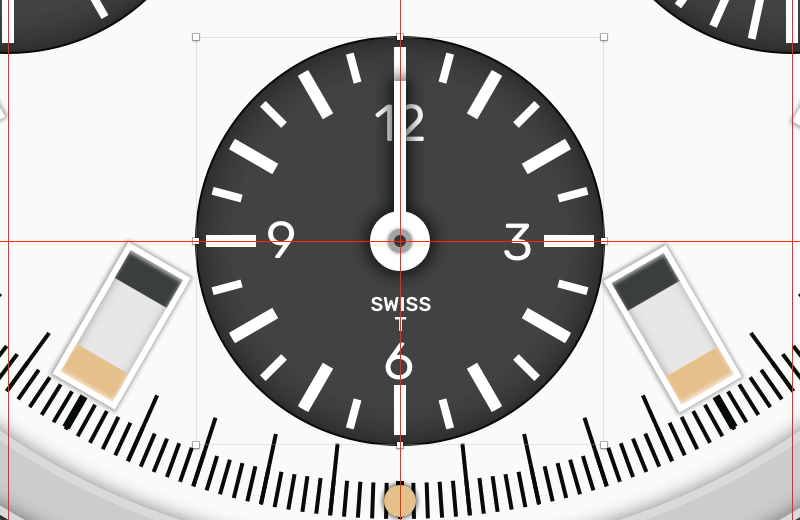
12-Hour Counter
This subdial is used to record events longer than 30 minutes (up to 12 hours), and it's placed at the bottom side of the dial, at the 6:00 position.
We will use the remaining subdial group to create the 12-hour counter. This counter has smaller markings at half-hour intervals, which means that we have 24 of these around the circle, and longer markings at the hour positions, which means that there are 12 of these around the circle.
Once again, Rotate Copies will help us creating those markings. For the half-hour markings, use a rectangle with the size of 4px by 15px, and for the hour marks, use a longer and bit bolder rectangle, 6px by 25px. Remember to delete those half-hour markings that are in the same position as the hour markings, since there's no need to have both. Also, add a small "Swiss T" title 12px away from the hand, using a white Rubik Medium font with the size set to 10px, Center alignment and a spacing Line of 10.
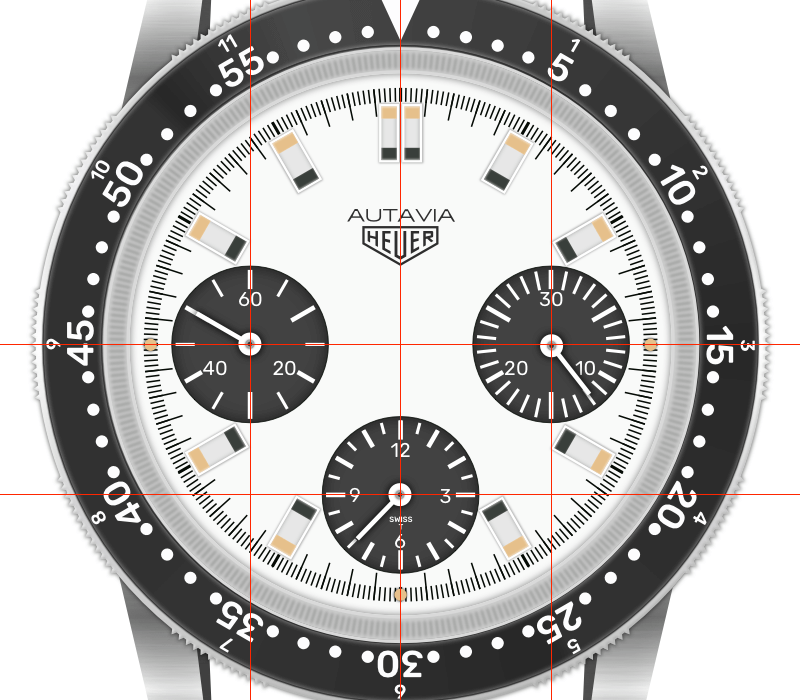
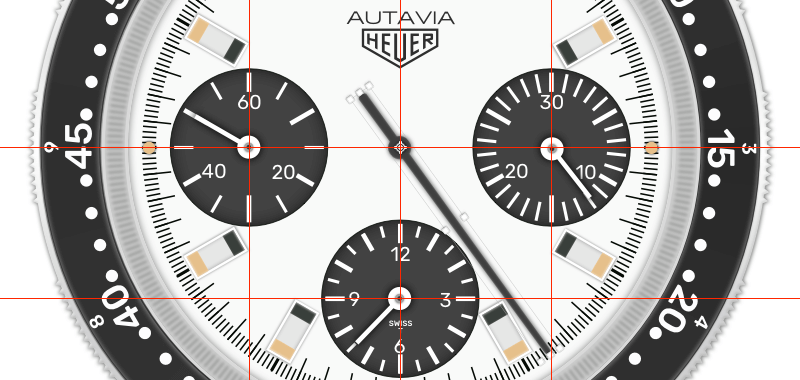
When done, change the group name to 12 hour counter, move it into position at 6:00, 55px away from the bottom edge of inner dial, and add a horizontal guide at the center (996px). Use the image below as a reference.
Our subdials are in place, and we can set the time for each subdial if we want. Simply select the hand group, select Rotate from the top toolbar, drag the crosshair to the intersection of the guides, and perform the rotation.
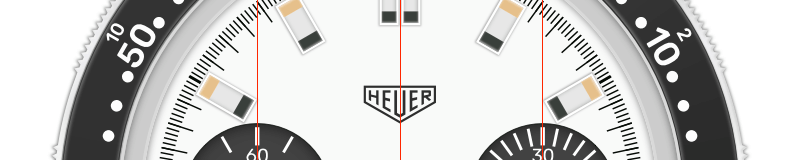
Finishing the Dial
It's time to put some branding on the dial. Jump over to Wikimedia Commons and download the Tag Heuer logo in SVG format. This is the current version of the logo; we will need to modify it a bit because we are recreating a watch from pre-Tag era.
Open the logo in Sketch, and delete everything except the red rectangle that holds the word Heuer. First, change the color of the letters to #2E2E2E. Then, select the rectangle, turn off Fill and add Borders, set the Position to Outside and the Color to #2E2E2E. Change the name of the group to Heuer logo.

Bring the modified logo into our design. Switch to the Scale tool in the top toolbar, and in the dialog box enter 50px in the height field, to adjust the size of the logo. The scale function will automatically calculate the correct width for any given height. Align the logo horizontally with inner dial, and place it 200px away from the top. Once again, select the rectangle that holds the lettering, and set the border Thickness to 3.
Let's add the watch's name above the logo. Download the Walkway Expand font family (it's free), install only the "Walkway Extend Black" font, and type the word "Autavia." Place it 3px above the logo, and align it horizontally with the logo. Set the Size to 24px, the spacing Character to 2, the Line to 24 and the Color to #2E2E2E (the same one that we used for the logo).
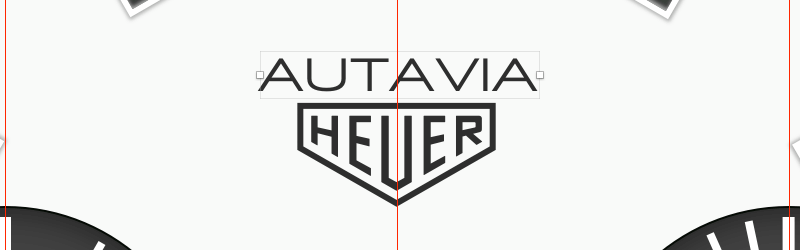
Next, convert the text block into vector shapes, by right-clicking and selecting Convert to Outlines. Then, modify the "A" a bit to make it look similar to the original "A" in vintage Heuer watches. Select the resulting vector shape, press Enter to go into vector point mode, zoom in close enough (I zoomed in to 800%) and select top-left point of the letter "A," and move it 1px to the left. Then, select the top-right point, and move it to the right by 1px. After that, select the small triangle inside the letter, add one point anywhere on the side line, and drag it up until it's on the same level as the middle point (a horizontal red line will appear). Adjust the position by dragging them a bit left and right inwards, and then readjust the positions of the other points to make an even width on the slanting lines. Use the image below as a reference.
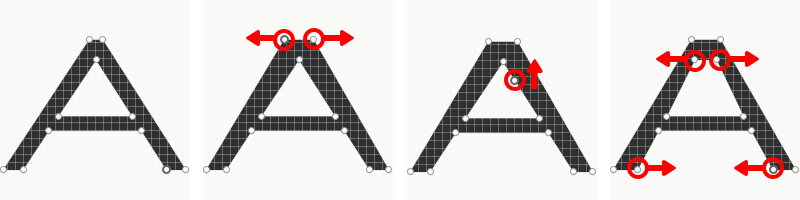
Do the same thing for the remaining "A" letters.
To finish the dial, we need to do one more thing: add the one-fifth of a second scale to outer dial. This is where the proper naming of shapes and groups helps. In the Layers panel on the left, find one-fifth of a second scale and copy it. Find the outer dial shape and paste it over. We need to scale it up, because it's smaller than outer dial. Select the Scale feature, and scale it up to 114%. Now it should be inside outer dial, right where we want it to be!
Apply a Gaussian Blur with an Amount of 2px, and lower the Opacity to 40%. Just to be sure that the scale doesn't exceed the outer dial, select both shapes and perform a Mask operation from the top toolbar. Sketch will place the result automatically into a group. Give this resulting group the name outer dial finished.
Performance tip: Gaussian blur is a CPU- and memory-intensive process. I noticed that Sketch's performance is better if Show Pixels is turned on. This setting can be enabled by going to View → Canvas → Show Pixels or by using the Ctrl + P shortcut. Given how complex the illustration is, periodically saving and restarting Sketch seems to help a bit, too.
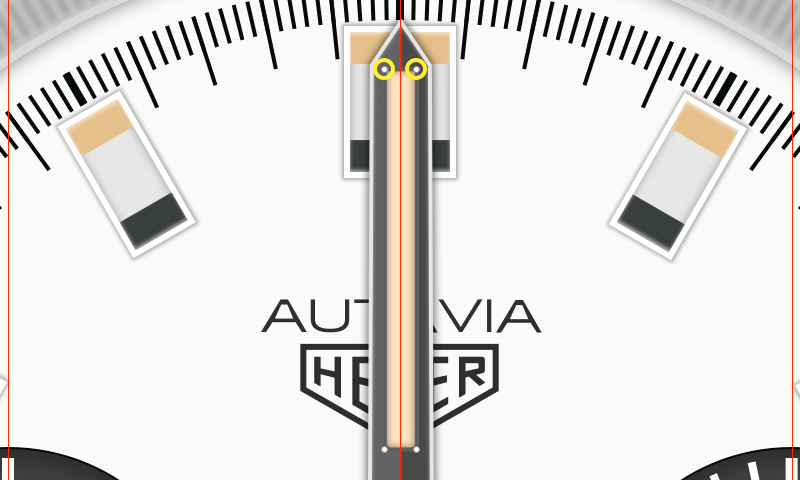
The Watch Hands
It's time to create the watch hands. We need to create the hour hand, the minute hand and the large second hand (which is part of the stopwatch).
The Hour Hand
Let's start with the hour hand because it's physically closest to the dial. Similar to how the subdial hands were made, this hand will also be made of a circle and rectangle. Zoom in a bit and create a circle in the middle of inner dial, with a diameter of 58px. Then, add a rectangle, also in the middle of inner dial, with dimensions of 30px by 246px. The rectangle should be 150px away from the top of inner dial.

Make sure the rectangle is still selected. Enter shape editing mode by double-clicking the rectangle or hitting Enter. Now, hold Command and click on the top segment to add a point in the exact middle. Push this point up by 20px.
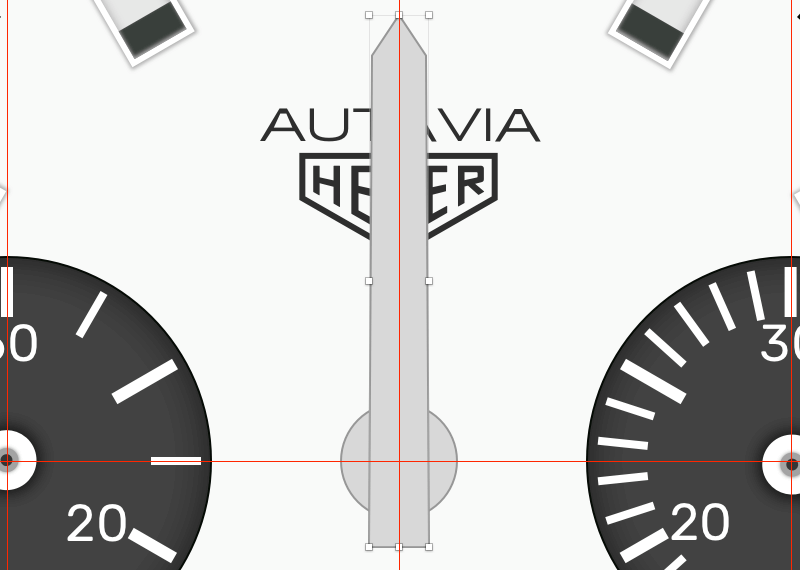
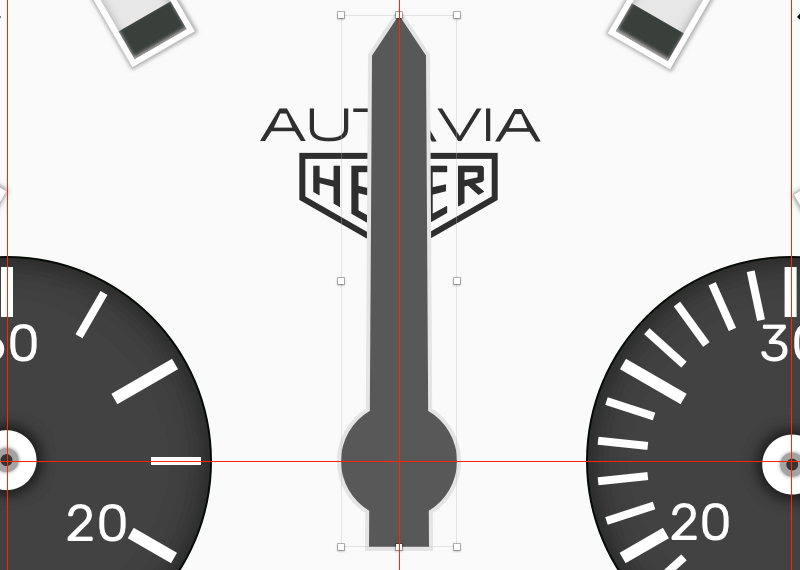
Select both shapes (the rectangle and circle), and merge them with Union from the top toolbar. Add a Fill of #585858, and add Borders with a Color of #E4E4E4, a Position of Outside and a Thickness of 2
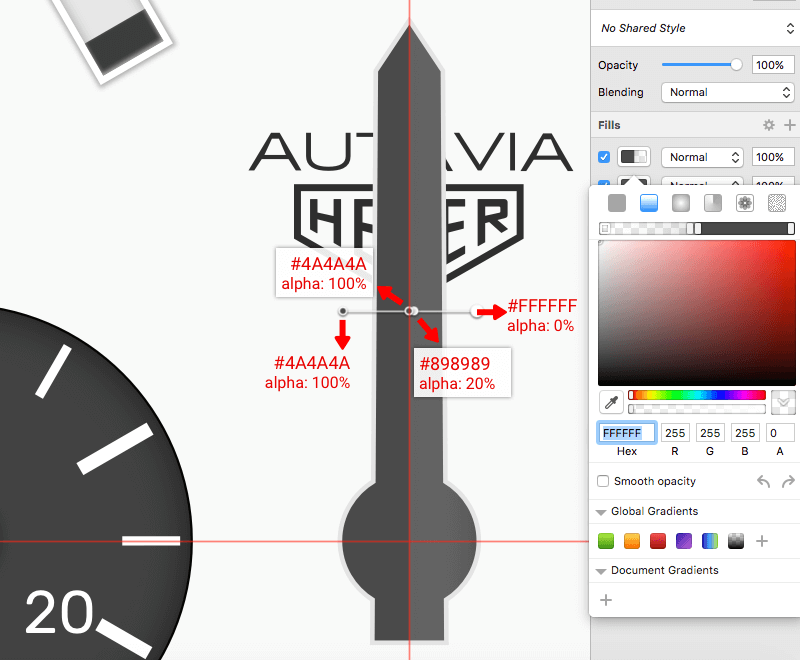
Let's give the hand a three-dimensional appearance. First, add a Linear Gradient fill on top of the existing fill; use #4A4A4A with 100% alpha for the first color stop and white with 0% for the last stop. Bring the gradient to a horizontal position with the left-pointing arrow in the color dialog. Now, add another point with a double-click on the gradient axis in the color dialog, and move it to the exact middle by pressing 5 on the keyboard. Give it 100% alpha, and make sure its color is #4A4A4A. Add another one to the right, and also move it to the center and then 1px to the right using right arrow key. Change the color of this stop to #898989 with 20% alpha.
Next, apply white Inner Shadows with 50% alpha and a Blur of 2. Then apply black Shadows with 70% alpha, a Blur of 6 and a Spread of 1.
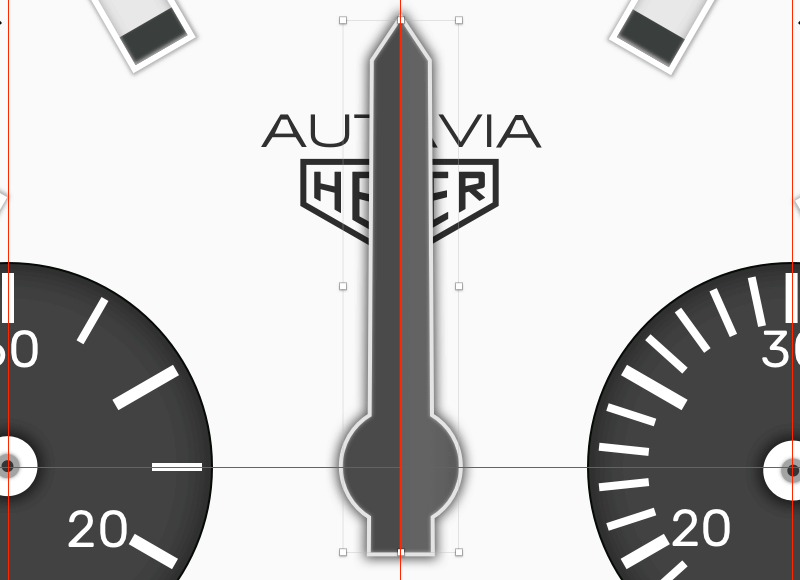
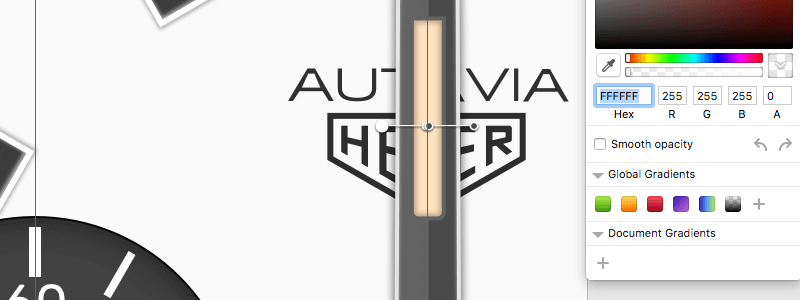
To finish the hour hand, we need to fill it with a luminescent color, so that it is possible to check the time in the dark. To do this, draw a rectangle with a size of 16px by 100px, and position it 22px away from the top of the hour hand. For the Fill, use #FFE4C0. Enter shape editing mode, select the two bottom points, and set the Radius to 3px. Add a Center border with a Thickness of 2, and set the Color to #626262. Add Inner Shadows to make it look like it's inside the hand. For the Color, use #000000 with 30% alpha, a Blur of 3 and a Spread of 3.
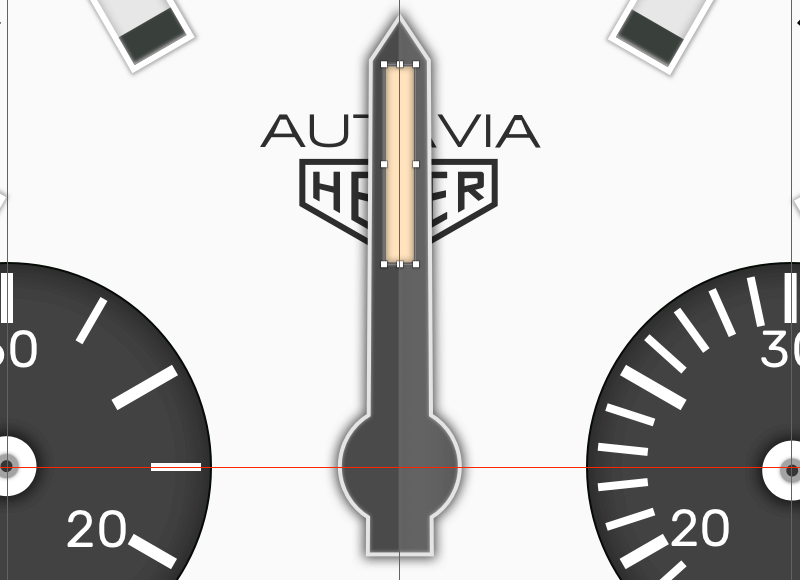
Select all of the hour-hand shapes, and place them in the hour hand group using Cmd + G.
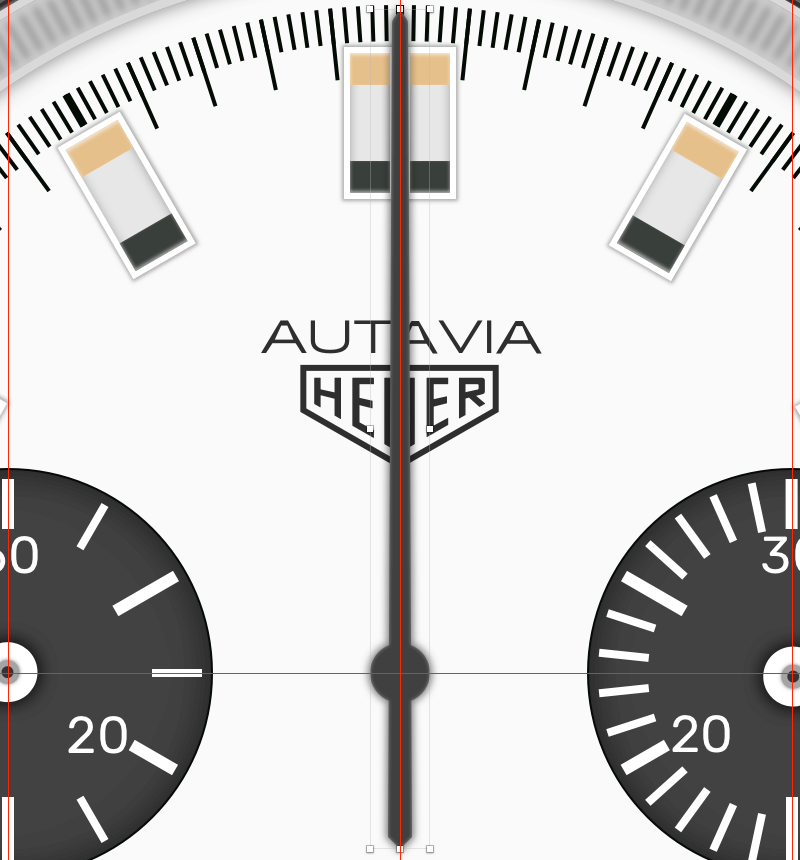
The Minute Hand
The minute hand is basically the same as the hour hand but longer and with a smaller circle. Duplicate the hour hand, hide the original layer, and name the new one minute hand. Go into the group, select the circle from the merged shape, go to Layer → Transform → Scale (or Cmd + K), and enter 80% (to scale it down by 20%).
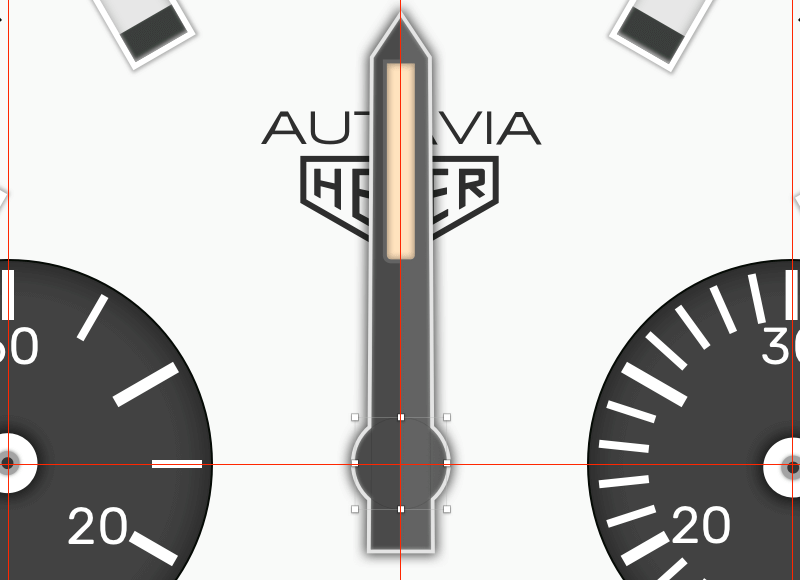
Make sure that the merged shape is selected, enter shape editing mode, select the top three points (hold Shift while clicking on the points to select them all), and push them up by 90px. Holding Shift and the up arrow key will move the selection in 10-pixel increments.
Click on the gradient fill and bring the gradient to the opposite side, using the right-pointing arrow twice in the color dialog. Also, edit the Shadows: Lower the alpha to 50%, set the Blur to 5 and the Spread to 1.
Finally, select the luminescent rectangle on top, enter shape editing mode, select two top points, and push them up by 90px as well. The minute hand is now complete.
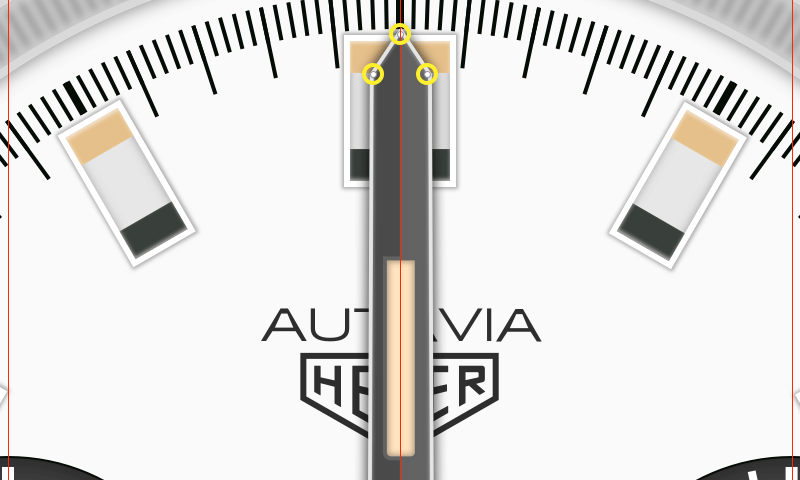
Large Second Hand
This hand moves only when the stopwatch mode is on, and it measures the elapsed time in seconds.
This hand is also made of a circle and rectangle, and we will create it using the same method. Hide the minute hand group, and draw a circle with a diameter of 30px in the middle of inner dial. Add on top a tiny rectangle with a size of 8px by 408px, and move the bottom two vector points in by 2px each to form a trapezoid; set it in the middle and 26px away from the top of inner dial. Use the same Fill of #404040 for the circle and rectangle, with borders turned off.
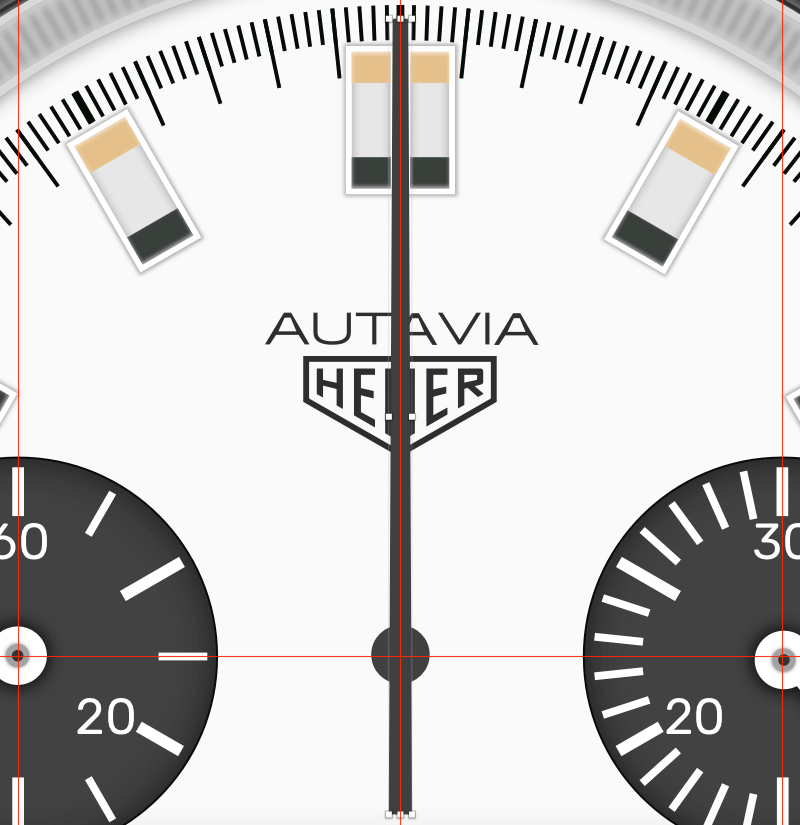
Add a point in the exact middle of the top and bottom segments, and push the top one 6px up and the bottom one 6px down.
Merge both shapes into a large seconds hand group using Union. Apply white Inner Shadows with 40% alpha and a Blur of 2, and black Shadows with 50% alpha, a Blur of 4 and a Spread of 1.
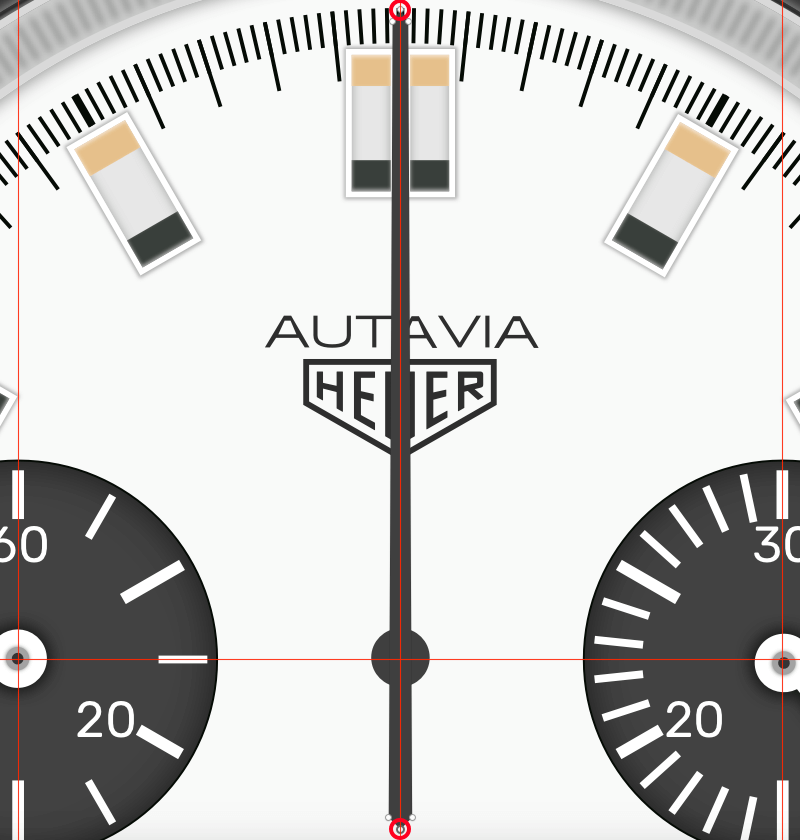
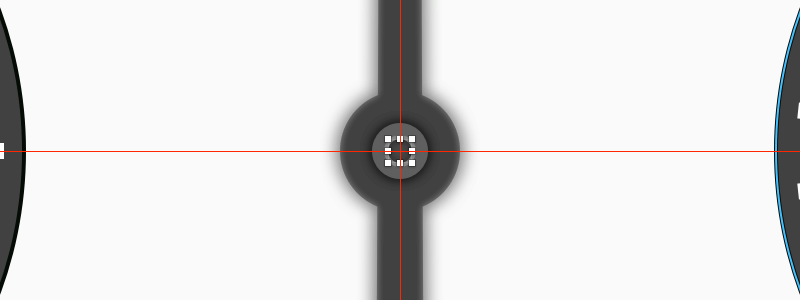
Finally, add a screw on top to hold the watch hands in place. Create a circle with a diameter of 14px in the middle of the artboard, with a Fill of #5F5F5F and borders turned off. Add a black Shadows effect with 50% alpha, the Blur set to 2 and a Spread of 1.

Add one more circle on top, this time with a diameter of 6px and the Fill set to #4C4C4C. Add an Outside border with a Thickness of 1 and a Color of #888888, and apply a black Inner Shadows effect with 50% alpha and a Blur of 3. Select both circles and group them into a screw group.
Now we can set the time to 10:08:24. Select large seconds hand, click on Rotate in the top toolbar, drag the crosshair marker to the intersection of the guides, and rotate it by 144 degrees to set it at 24 seconds.
Bring back minute hand into the scene by unhiding it, and then rotate it by 48 degrees, just like we did with large seconds hand, to read 8 minutes.

Finally, unhide hour hand, and set it to a little after 10:00 (-56 degrees — rotating counter-clockwise is much easier than going around the full circumference).

The Crown
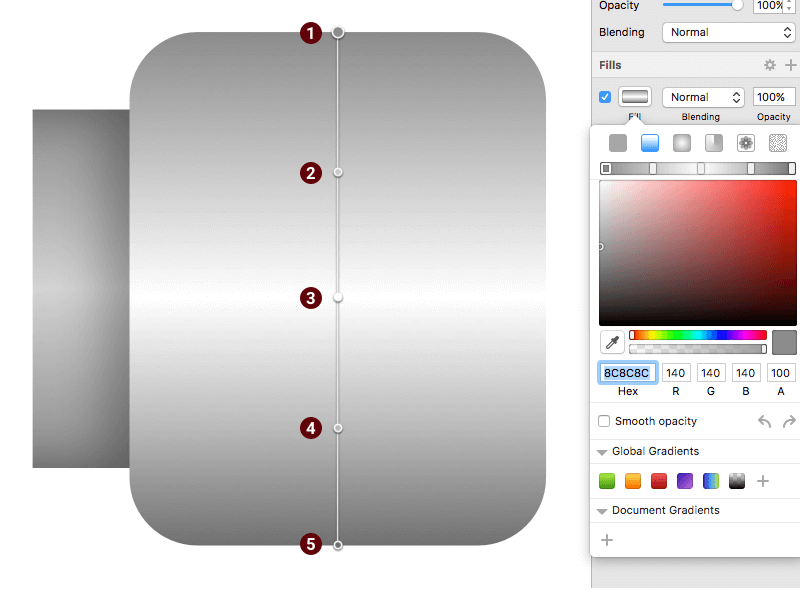
Time to create the watch crown. Start with a rectangle of 78px by 162px. Align it vertically to the artboard, turn off borders, and apply Linear Gradient with the following parameters, from top to bottom:
-
#989898 -
#A5A5A5 -
#E8E8E8 -
#8C8C8C -
#787878
Enter shape editing mode, select the two vector points on the right side of the rectangle, and set the Radius to 10px.

Hold Cmd and click on the right segment to add a point in the middle. Push this point right by 20px and double-click on it to turn it to a Mirrored vector point.

Select the Vector tool (V) and draw a line like in the image below. Set the border Color to #F0F0F0 and the Thickness to 3. Add a black Shadows effect with 20% alpha, and set Y and Blur to 2.
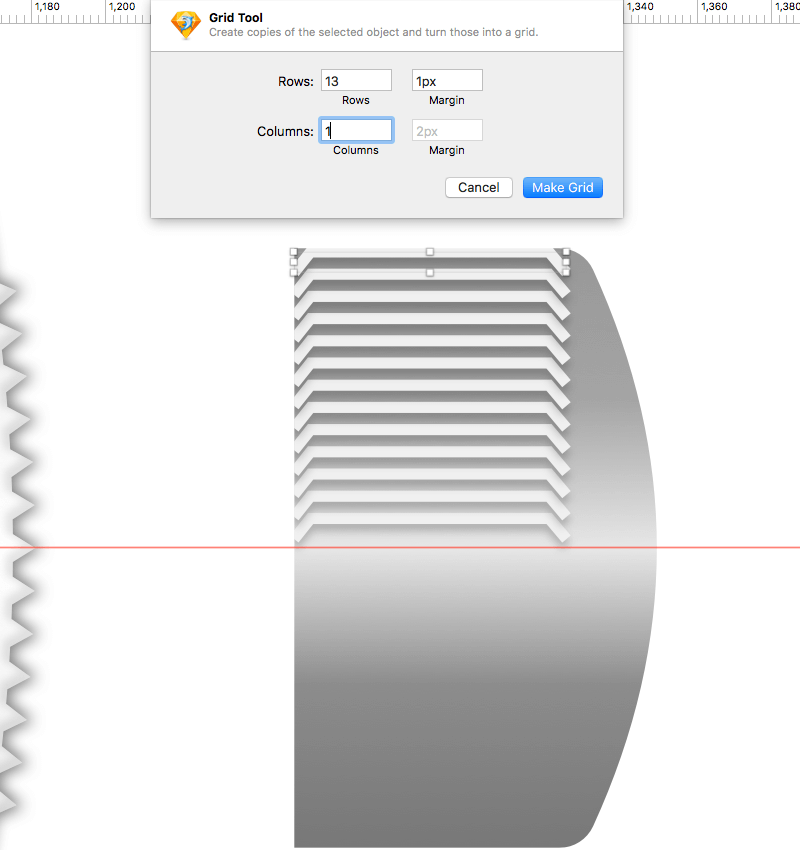
We will use this line to create toothed edges around the crown. Go to Arrange → Make Grid, and in the dialog box set Rows to 13, Margin to 1px and Columns to 1, and click on Make Grid. "Make Grid" will distribute the selected layers with predefined spacing between them.
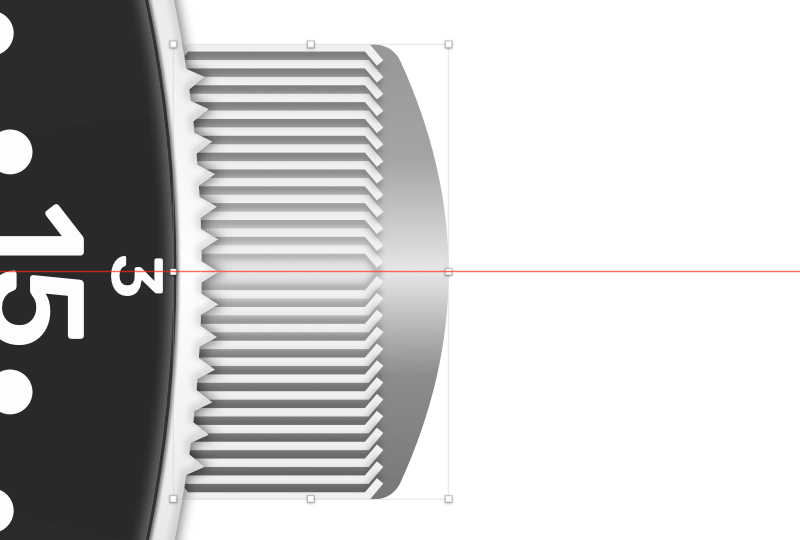
We have filled the top half of the crown. The easiest way to fill the bottom half is to select all paths created with "Make Grid," group them, Duplicate (Cmd + D), Flip Vertically, and move it to the bottom half of the crown. Then, select both groups and the crown shape, and perform a Mask operation so that none of the created elements go outside of the crown shape. Name the resulting group crown.

Drag the crown to the left, and send it behind the case in the Layers panel.
The Pushers
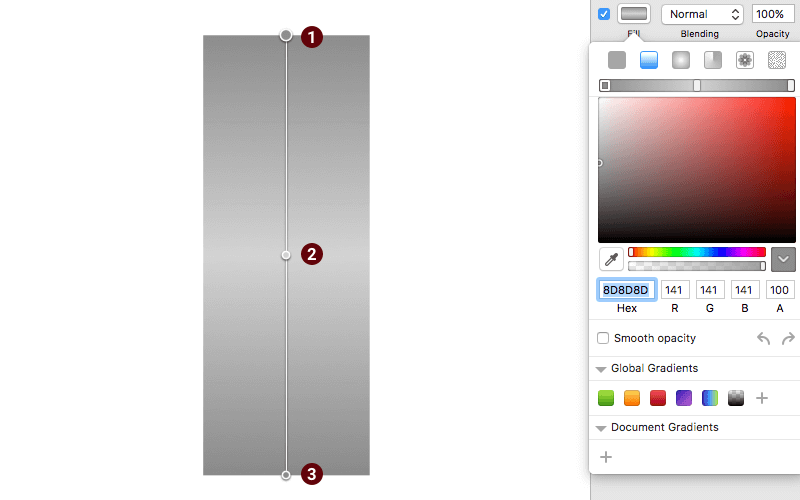
Chronograph buttons (or "pushers") start, stop and reset the chronograph function without interfering with the watch. Let's add those buttons to the side of the case. Each pusher is made of two rectangles, one on top of the other. Draw a first rectangle of 28px by 74px, turn off borders, and apply a Linear Gradient for the Fill:
-
#8D8D8D -
#D3D3D3 -
#8A8A8A
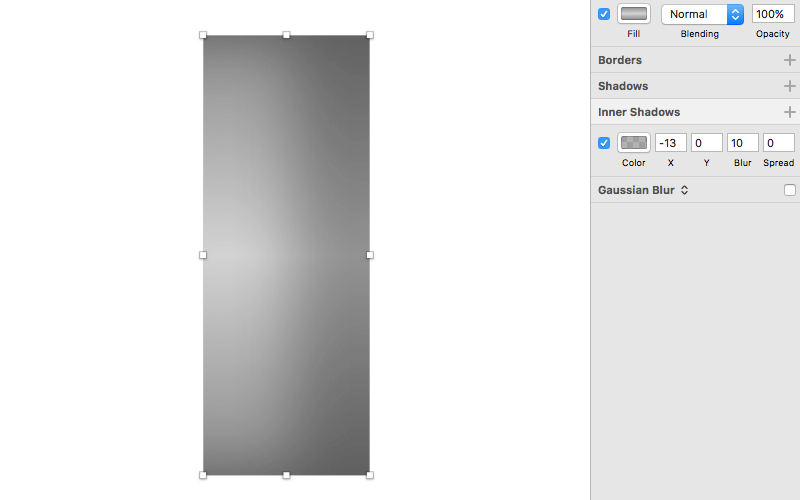
Apply black Inner Shadows with 30% alpha, and set Y to -13 and Blur to 10.
Draw second rectangle on top, 20px away from the left segment, with a size of 86px by 106px, and Align Vertically with the one below. Set Radius to 14px, make sure borders are turned off, and use Linear Gradient for the fill:
-
#8C8C8C -
#CACACA -
#FFFFFF -
#BABABA -
#707070
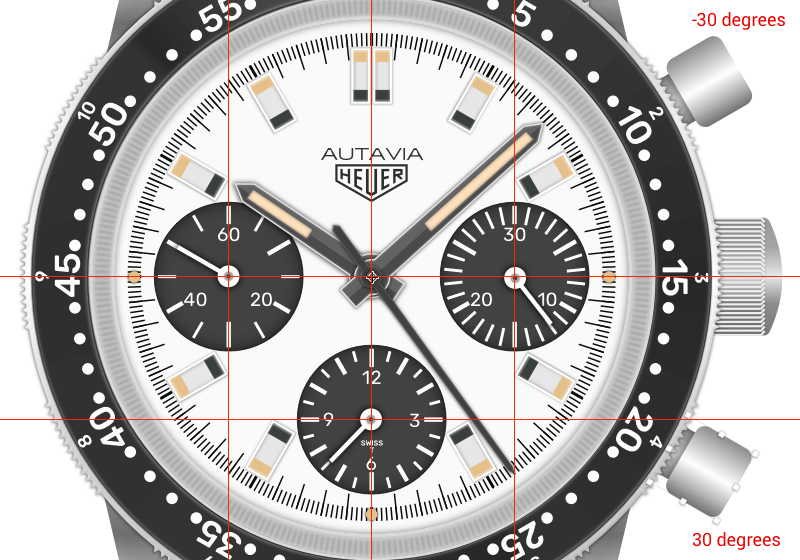
Select both rectangles and group them in the pusher group, and Align Vertically to artboard. Duplicate this group, because we need two pushers, one above and one below crown.
Send them below case in the Layers panel, and rotate the first by -30 degrees and the second by 30 degrees, with the crosshair marker set at the intersection of the guides.
The Strap
We're almost there. For the final touches, we will create the straps.
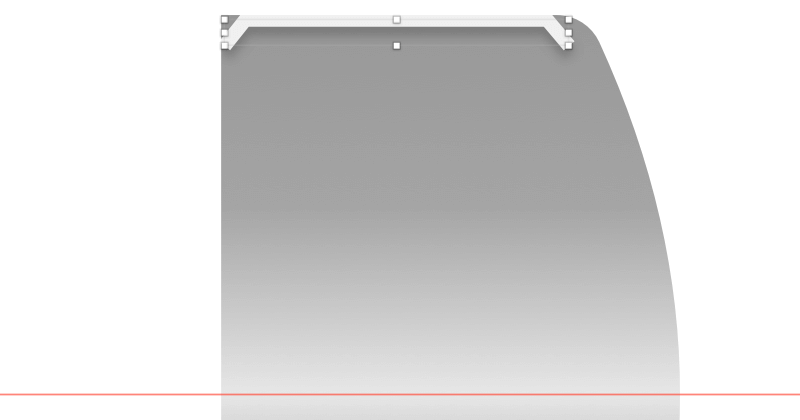
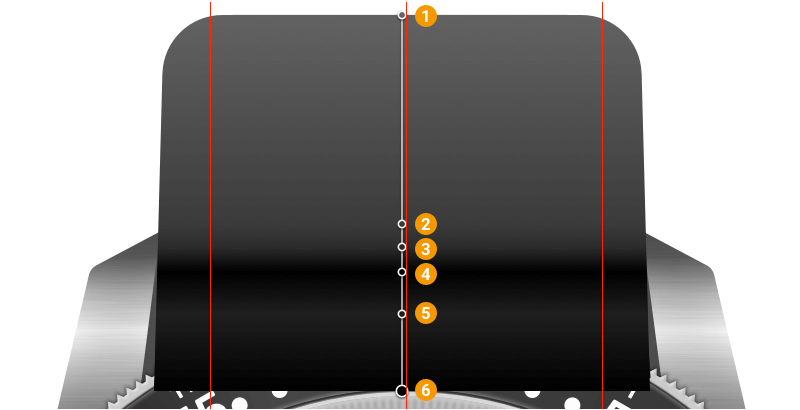
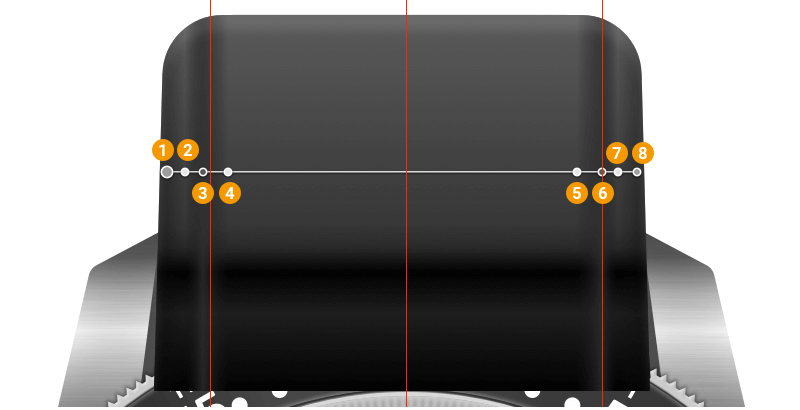
Add a rectangle of 476px by 376px between the top lugs, and align it vertically with the artboard. Select the top two vector points, and set the Radius to 60px. Then, move the bottom two vector points by 10px each to form a trapezoid.

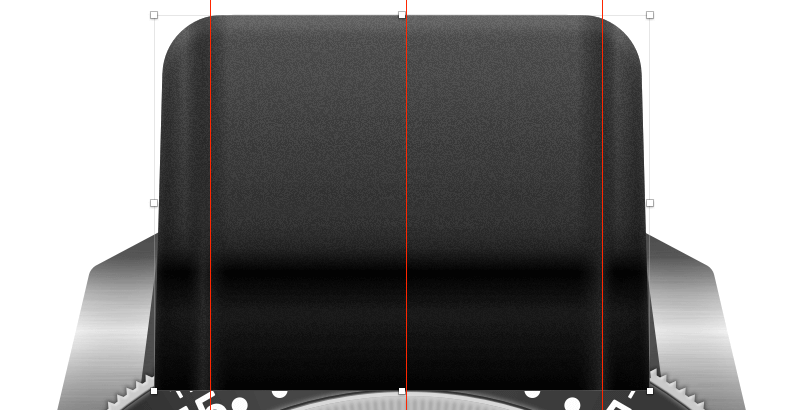
Uncheck Borders, click on the Fill button, switch to Linear Gradient, and create a gradient using the following settings:
-
#636363 -
#3B3B3B -
#2B2B2B -
#000000 -
#1F1F1F -
#000000
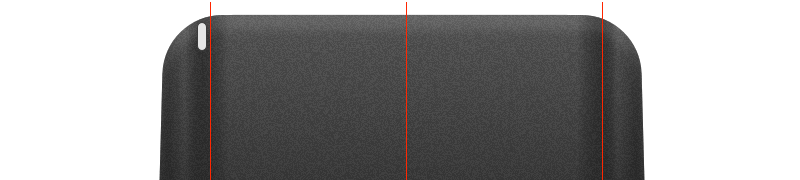
Add a horizontal Linear Gradient to imitate the leather embossing effect that real stitches make. The settings are:
-
#0C0C0Cwith40%alpha -
#0E0E0Ewith10%alpha -
#2E2E2Ewith80%alpha -
#181818with10%alpha -
#181818with10%alpha -
#2E2E2Ewith80%alpha -
#0E0E0Ewith10%alpha -
#0C0C0Cwith40%alpha
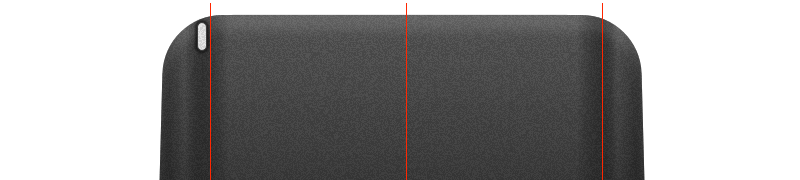
Add Noise Fill on top, with Soft Light blending and an Opacity of 20%, to add a subtle texture. Finally, add white Inner Shadows with 10% alpha, and set Y to 15 and Blur to 10.
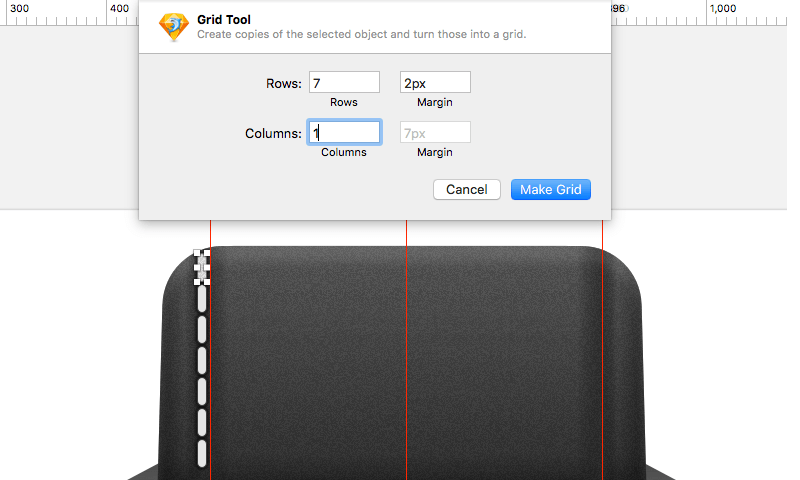
Finish the strap by adding contrast stitching that is common on the straps. Create a Rounded Rectangle (U) of 10px by 30px, with a Radius of 5. Set the border Color to #3B3B3B, with an Inside position and a Thickness of 1. Change the Fill to #E6E6E6.
Add texture by using Noise Fill on top, with Overlay blending and an Opacity of 70%. Then, apply Shadows with the color set to #000000 with 50% alpha and the Blur and Spread set to 2.
Use Make Grid to add stitches vertically. In the dialog box, set Rows to 7, Margin to 2px and Columns to 1.
Select all of the stitches, duplicate and move them to the right side of the strap.
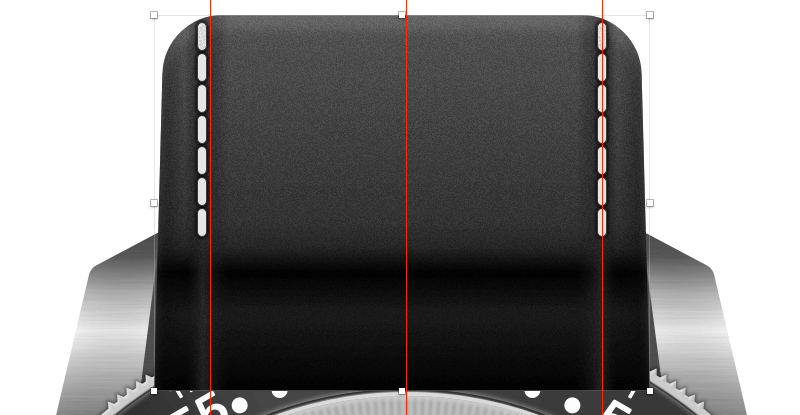
Select all of the shapes that are part of the strap (the stitches and strap shape), and group them into the strap top group. Move this group just above case in the Layers panel. To create a bottom strap, duplicate the strap top group, Flip Vertically, move it between the bottom lugs, and change the name to bottom strap. Select and put all watch elements into one group, autavia. Our watch is now officially finished!
Finally, let's add a background. Create a rectangle of the same size as the artboard, set the Fill to #0D0F0E, and push it below the autavia group.
Conclusion
Now you know how to recreate one of my favorite watches. Chronographs are magnificent pieces of engineering and state-of-the-art technology, and while the tutorial probably wasn't easy, the result is quite good in my opinion — not unlike the process of building a real watch!
The next step, of course, is to design your own favorite illustration. Select a watch (or another object you like), and be sure to get as many photos from different angles, so that you can replicate all of the important details. As you can see, there are certain tools and features in Sketch that you can master to create similar objects; use them to speed up and simplify the whole process.
Each wristwatch has different features, but in this case we've covered most of them, and I'm pretty sure that you can now reverse-engineer any other watch.
Next, imagine exporting these elements to SVG format and animating them. Imagine recreating not only how they look, but also how they work!
Finally, if you have any questions, please leave a comment or ping me on Twitter. I will gladly help you.
![]() (mb, al, il)
(mb, al, il)
How To Draw A Wrist Watch Step By Step
Source: https://www.smashingmagazine.com/2017/10/realistic-chronograph-watch-sketch/
Posted by: jacksonsentin2001.blogspot.com
0 Response to "How To Draw A Wrist Watch Step By Step"
Post a Comment